How to pass data between BabylonJS and Vue
Prerequisites
You have to follow and finish the How to use BabylonJS with Vue tutorial first.
These principles have to be clear for you: Passing of variables by Value and by Reference in Javascript.
Basic knowledge about Vue, Vue Components and about data passing between components is crucial for this tutorial. If you are not familiar with these topics, you will not be able to follow the tutorial. You can find the required information for data passing on The official Vue 2 Components Basic page and on The official Vue 3 Components Basic page.
You need a clone of the repository from https://github.com/RolandCsibrei/babylonjs-vue2-javascript-basic-setup. This is were we left off in part 1, so you can edit along reading the tutorial, or you can clone a repo with all the changes already made from here: https://github.com/RolandCsibrei/babylonjs-vue2-javascript-basic-setup/tree/all.
The goal of this tutorial is to show how to connect the two frameworks together and not how to use these frameworks alone. You need to be familiar with both frameworks at basic level to get started.
This example uses Vue 2. All the techniques are the same for Vue 3, you just have to modify the Vue part of the code to make it working in Vue 3. Basically instead of data() you have to declare your variables in the setup method and the mounted hook is replaced by onMounted.
The Example
We will create an FPS counter which will be displayed by Vue, but the data will be provided by the BabylonJS scene.
- The first approach will use callbacks to send data from the BabylonJS scene to the Vue component and this component will
emitthe data to it's parent component, where the FPS finally gets displayed. The BabylonJS scene is not exposing any of it's objects to the Vue component. - The second approach will expose the BabylonJS
EngineandSceneobject to the Vue component and we will get the required data in the Vue component from the exposedEngineobject.
After finishing this part we will learn how to pass data from the Vue component to the BabylonJS scene and we will make some cubes move.
- The first approach will not expose any BabylonJS objects to the Vue component and the BabylonJS scene will be controlled via custom methods exposed by the scene.
- The second approach will expose only the required
Vector3BabylonJS object with the position of the cube, so we can move our cube by directly modifiying this object's properties. We will read rotation data from aVector3object in our component in real-time as well. - The final, third approach will expose the
EngineandSceneobject and the Vue component will manipulate the scene by using these objects.
Passing data from BabylonJS to Vue using callbacks
GitHub: https://github.com/RolandCsibrei/babylonjs-vue2-javascript-basic-setup/tree/fps-by-callback
This is the most verbose but safest, most extendable and reusable approach. Basically you will create methods in the BabylonJS scene code and export them accordingly, so they can be imported into the Vue component and respectivelly called.
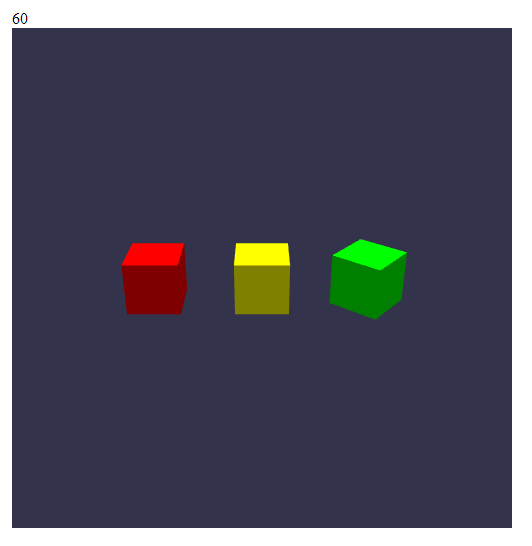
Modify src/scenes/MyFirstScene.js and copy paste this code or just follow along if you have cloned the repository for this part. This a simple scene with three cubes, red, yellow and green. The green one is rotating. It is achieved by incrementing the rotation.y value on the cube in each frame.
The main change is the addition of the second parameter fpsCallback in the createScene method. This must be a function with one parameter (the current FPS rate as a number) and will be called each frame.
import { Engine, Scene, FreeCamera, Vector3, MeshBuilder, StandardMaterial, Color3, HemisphericLight } from "@babylonjs/core";const createScene = (canvas, fpsCallback) => {  const engine = new Engine(canvas);  const scene = new Scene(engine);
  const camera = new FreeCamera("camera1", new Vector3(0, 5, -10), scene);  camera.setTarget(Vector3.Zero());  camera.attachControl(canvas, true);
  new HemisphericLight("light", Vector3.Up(), scene);
  const boxRed = MeshBuilder.CreateBox("box-red", { size: 1 }, scene);  const materialRed = new StandardMaterial("box-red-material", scene);  materialRed.diffuseColor = Color3.Red();  boxRed.material = materialRed;  boxRed.position.x = -2;
  const boxBlue = MeshBuilder.CreateBox("box-yellow", { size: 1 }, scene);  const materialYellow = new StandardMaterial("box-blue-material", scene);  materialYellow.diffuseColor = Color3.Yellow();  boxBlue.material = materialYellow;
  const boxGreen = MeshBuilder.CreateBox("box-green", { size: 1 }, scene);  const materialGreen = new StandardMaterial("box-green-material", scene);  materialGreen.diffuseColor = Color3.Green();  boxGreen.material = materialGreen;  boxGreen.position.x = 2;
  engine.runRenderLoop(() => {    scene.render();
    boxGreen.rotation.y += 0.01;
    if (fpsCallback) {      fpsCallback(engine.getFps().toFixed());    }  });};
export { createScene };
Now open src/components/BabylonScene.vue and use this code. The change here is that we've added a callback to our createScene method. Our fpsCallback method will be called by the BabylonJS scene in each frame as described above. The callback method then emmits that FPS value to the parent component, in our example to App.vue.
<template>  <div>    <canvas ref="bjsCanvas" width="500" height="500" />  </div></template>
<script>import { createScene } from "../scenes/MyFirstScene";
export default {  name: "BabylonScene",
  mounted() {    const bjsCanvas = this.$refs.bjsCanvas;    if (bjsCanvas) {      const fpsCallback = (fps) => {        this.$emit("fps", fps);      };      createScene(bjsCanvas, fpsCallback);    }  },};</script>
Now open src/App.vue and use this code. Please note that we have added a custom event listener to our BabylonScene.vue component and a method called fpsReceived which just sets fps. The <label> in the template gets automatically updated. Some styling has been added as well.
<template>  <div>    <label>{{ fps }}</label>    <BabylonScene @fps="fpsReceived" />  </div></template>
<script>import BabylonScene from "./components/BabylonScene.vue";
export default {  name: "App",  components: {    BabylonScene,  },  data() {    return {      fps: 0,    };  },  methods: {    fpsReceived(fps) {      this.fps = fps;    },  },};</script>
<style>body {  padding: 10px;}
label {  display: block;}</style>
That's all, we can run our example by issuing the npm run serve command in the terminal. You should see this image. FPS should be displayed in the left upper corner.
Passing data from BabylonJS to Vue using an exposed Engine object
GitHub: https://github.com/RolandCsibrei/babylonjs-vue2-javascript-basic-setup/tree/fps-by-exposed-engine
Open src/components/BabylonScene.vue and use this code. The big changes here are that the createScene method returns the Engine and the Scene objects, so they are exposed to the Vue component and the component can directly access them. We store these two objects into our Vue component for later access. Just right after that we create an interval to emit the FPS value to the parent App.vue component every 1 second. We get the FPS value from the exposed BabylonJS Engine object directly in our Vue component.
<template>  <div>    <canvas ref="bjsCanvas" width="500" height="500" />  </div></template>
<script>import { createScene } from "../scenes/MyFirstScene";
export default {  name: "BabylonScene",
  data() {    return {      scene: null,      engine: null,      interval: null,    };  },
  methods: {    setupFpsEmitter() {      const interval = setInterval(() => {        const fps = this.engine.getFps().toFixed();        this.$emit("fps", fps);      }, 1000);      this.interval = interval;    },  },  mounted() {    const bjsCanvas = this.$refs.bjsCanvas;    if (bjsCanvas) {      const { engine, scene } = createScene(bjsCanvas);      this.engine = engine;      this.scene = scene;
      this.setupFpsEmitter();    }  },  unmounted() {    if (this.interval) {      clearInterval(this.interval);    }  },};</script>
Edit src/scenes/MyFirstScene.js and add
return { engine, scene };at the end of the createScene method. If you are getting lost, please have a look at the code in the repository.
Now it's time to run our app as usual and the result must be the same as with the callbacks.
Sending data from Vue to BabylonJS with loose coupling and without exposing the BabylonJS objects to Vue
GitHub: https://github.com/RolandCsibrei/babylonjs-vue2-javascript-basic-setup/tree/vue-to-bjs-no-expose
As already written, we simply create a method for everything we need to access or manipulate. Modify the src/scenes/MyFirstScene.js BabylonJS scene file and export these methods so they can be imported in the Vue component.
We need to wrap our methods and properties into an object, in our case called myScene and export this object, so we can store the Engine and the Scene objects into this object:
const myScene = { engine: null, scene: null, createScene: function(canvas) { const engine = new Engine(canvas);At the end add a method as follows. This method can be called by any caller, including our Vue component and it simply repositions a mesh identified by the name parameter name.
setPosition: function(name, x, y, z) { const mesh = this.scene.getMeshByName(name); if (mesh) { mesh.position = new Vector3(x, y, z); } },Our App.vue must be changed like this. We've added a button which triggers the yellow cube's movement. We are injecting the cubePosition object into our BabylonScene Vue component using it's property called position. Than there are simple helper methods just to make some movement.
<template>  <div>    <button @click="moveCube">Move Cube</button>    <BabylonScene :position="cubePosition" />  </div></template>
<script>import BabylonScene from "./components/BabylonScene.vue";
export default {  name: "App",  components: {    BabylonScene,  },  data() {    return {      cubePosition: {},
      offset: 0,      x: 0,      y: 0,      z: 0,    };  },  methods: {    moveCube() {      this.getNextPosition();      this.moveCubeTheRightWay();    },    moveCubeTheRightWay() {      this.cubePosition = { x: 2, y: this.y, z: this.z };    },    getNextPosition() {      this.offset += 0.5;      this.x = 0;      this.y = 0 + this.offset;      this.z = 0;    },  },};</script>
When changing the cubePosition object in the code above, the BabylonScene Vue component will automatically retrieve this object in its property. So open src/components/BabylonScene.vue and let's look at the changes.
We are exporting our BabylonJS scene from MyFirstScene.js as default, so we don't use curly braces when importing a default export. We've defined a property called position with a default value. This property will receive the cubePosition object from App.vue. We would like to be notified about the changes, so we setup a Vue watcher which will simply call the BabylonJS scene method for positioning the cube.
<script>import myScene from "../scenes/MyFirstScene";
export default { name: "BabylonScene", props: { position: { type: Object, default() { return { x: 0, y: 0, z: 0 }; }, }, },
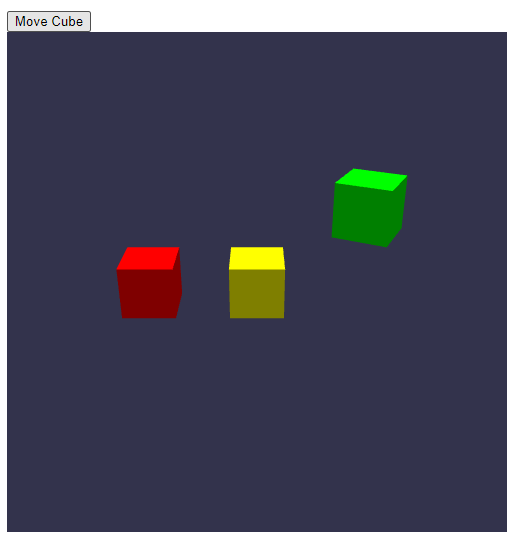
watch: { position(val) { if (val) { myScene.setPosition("box-green", val.x, val.y, val.z); } }, }, mounted() { const bjsCanvas = this.$refs.bjsCanvas; if (bjsCanvas) { myScene.createScene(bjsCanvas); } },};</script>You can now start the app and you should see the following. Click on the button to move the green cube upwards.
Sending data from Vue to BabylonJS and vice versa with an exposed BabylonJS Vector3 object
In this example we will show the communication using an exposed BabylonJS object. In the last method we will expose the Engine and the Scene objects. Expose so little, so little you can. Exposing only a Vector3 is far more better, than exposing for example the whole Scene.
In this scenario we get the required Vector3 objects from the BabylonJS scene by invoking methods on it. We use the methods getPosition and getRotation. We emit these Vector3 objects to the parent component, to App.vue afterwards, where the data gets displayed.
So we have added these methods to src/scenes/MyFirstScene.js. Pretty simple, isn't it?
getPosition: function(name) {    const mesh = this.scene.getMeshByName(name);    if (mesh) {      return mesh.position;    }  },
  getRotation: function(name) {    const mesh = this.scene.getMeshByName(name);    if (mesh) {      return mesh.rotation;    }  },
Now we can make changes in src/components/BabylonScene.vue. We get two objects, the position of the yellow cube and the rotation of the green cube. We then emit these objects to the parent component. We have to call the functions which emits the data in the mounted callback after the scene was created.
methods: { emitPositionVector() { const bjsPositionVector = myScene.getPosition("box-yellow", this.scene); this.$emit("bjsPositionVector", bjsPositionVector); }, emitRotationVector() { const bjsRotationVector = myScene.getRotation("box-green", this.scene); this.$emit("bjsRotationVector", bjsRotationVector); }, }, mounted() { const bjsCanvas = this.$refs.bjsCanvas; if (bjsCanvas) { myScene.createScene(bjsCanvas);
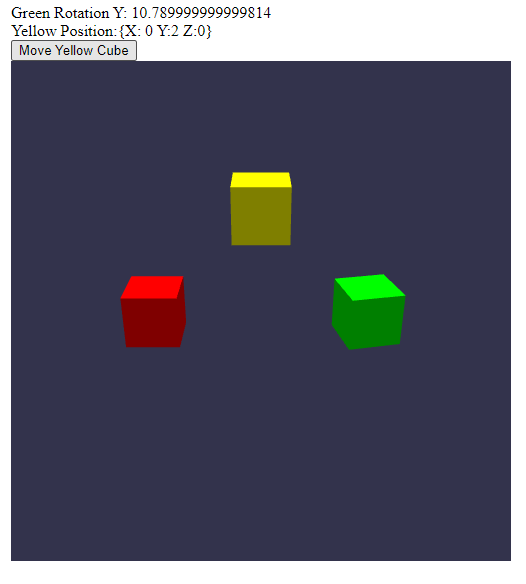
this.emitPositionVector(); this.emitRotationVector(); } },Finally our parent component src/components/App.vue. We've added two labels. The labels gets automatically updated, when the rotation stored in bjsRotationVector.y gets updated and the position, it's the same story.
Next we have a button, which calls moveCube when clicked. This method calls some other helper methods which alters the values and the important part is in the method moveCubeSharedVector, where we set the y property directly on the BabylonJS Vector3 object. Keep in mind, that this will work until the original Vector3 is still existing and is still the same object. If the Vector3 is changed in the scene code, the Vue component will not know about it. So you have to be careful, what are you doing.
The same goes on with the bjsRotationVector. Vue is displaying the y property directly from the BabylonJS Vector3 object. The same applies here, if you loose the object reference, this will stop working.
<template>  <div>    <label v-if="bjsRotationVector"      >Green Rotation Y: {{ bjsRotationVector.y }}</label    >    <label v-if="bjsPositionVector"      >Yellow Position:{{ bjsPositionVector }}</label    >    <button @click="moveCube">Move Yellow Cube</button>    <BabylonScene      @bjsPositionVector="bjsPositionVectorReceived"      @bjsRotationVector="bjsRotationVectorReceived"      :position="cubePosition"    />  </div></template>
<script>import BabylonScene from "./components/BabylonScene.vue";
export default {  name: "App",  components: {    BabylonScene,  },  data() {    return {      cubePosition: {},
      offset: 0,      x: 0,      y: 0,      z: 0,
      bjsPositionVector: null,      bjsRotationVector: null,    };  },  methods: {    bjsPositionVectorReceived(bjsPositionVector) {      this.bjsPositionVector = bjsPositionVector;    },    bjsRotationVectorReceived(bjsRotationVector) {      this.bjsRotationVector = bjsRotationVector;    },    moveCube() {      this.getNextPosition();
      this.moveCubeSharedVector();    },
    moveCubeSharedScene() {      this.cubePosition = { x: -2, y: this.y, z: this.z };    },    moveCubeSharedVector() {      if (this.bjsPositionVector) {        // this.bjsPositionVector = new Vector3(0, this.y, this.z);        // the line above will not work, you must not create a new object        // but you have to modify the existing one's properties        this.bjsPositionVector.y = this.y;      }    },
    getNextPosition() {      this.offset += 0.5;      this.x = 0;      this.y = 0 + this.offset;      this.z = 0;    },  },};</script>
After running the app, you should see this screen:
Sending data from Vue to BabylonJS with an exposed BabylonJS Engine and Scene object
And finally the third method we are going to try is to expose the Engine and the Scene object to the BabylonScene Vue component.
Make sure the scene code in src/scenes/MyFirstScene.js returns the Engine and the Scene object from the createScene method:
return { engine, scene };Open src/components/BabylonScene.vue and make these modifications. We need a data section to store the Engine and Scene for later use. We create the scene and get these objects in the mounted callback. We have a Vue property, which receives the position for the red cube. We want to react to changes in this property, so we setup a watcher for the property position. When changed and here comes the interesting part, we directly access the BabylonJS Scene object and calling directly it's methods to reposition the red cube.
props: { position: { type: Object, default() { return { x: 0, y: 0, z: 0 }; }, },},data() { return { scene: null, engine: null, };},watch: { position(val) { if (val) { const box = this.scene.getMeshByName("box-red"); const position = new Vector3(val.x, val.y, val.z); if (box) { box.position = position; } } },},mounted() { const bjsCanvas = this.$refs.bjsCanvas; if (bjsCanvas) { const { engine, scene } = createScene(bjsCanvas); this.engine = engine; this.scene = scene; }},Other methods of data passing
There are much more methods to pass data between Vue and BabylonJS, generally in Javascript as well. We have demonstrated only a few techniques. If you are interested in WebWorkers and want to use the offline canvas rendering capability of BabylonJS, you have to choose data communication using messaging.
Conclusion
As you can see, it's up to the programmer to choose the right approach. There is a safer, but slower and more verbose way and there are methods less safe, but quicker. Just keep in mind, that exposing objects from BabylonJS to Vue and make them reactive in Vue is quite dangerous. You can end up with multiple canvas redraws in one tick.
Now the we've learned how to control the scene from Vue, it can be very tempting to overuse this technique. Keep your data flow between Vue and BabylonJS at minimum and for example do not animate an object on the scene by setting it's properties from Vue every frame, create a method on the scene instead, let's call it animateMeshVisibility(name, from, to, duration) and call this method from Vue once to start the animation.
Where to go next?
Visit our great Getting started page or if you are interested in more advanced Vue stuff, jump to part three of this tutorial.
Links
All links from this tutorial at one place
Part 1 of this tutorial
Part 3 of this tutorial
Part 4 of this tutorial
https://github.com/RolandCsibrei/babylonjs-vue2-javascript-basic-setup/branches/all
https://github.com/RolandCsibrei/babylonjs-vue2-javascript-basic-setup/tree/fps-by-callback
https://github.com/RolandCsibrei/babylonjs-vue2-javascript-basic-setup/tree/fps-by-exposed-engine
https://github.com/RolandCsibrei/babylonjs-vue2-javascript-basic-setup/tree/vue-to-bjs-no-expose
From part 1:
https://github.com/RolandCsibrei/babylonjs-vue3-javascript-basic-setup
https://github.com/RolandCsibrei/babylonjs-vue2-javascript-basic-setup
A bit different approach with a window resize listener:
https://github.com/RolandCsibrei/babylonjs-vue3-javascript
If you landed on this page, because you are looking for how to use BabylonJS with Quasar on top of Vue, we ha a starter repo for you as well:
https://github.com/RolandCsibrei/babylonjs-quasar-vue2-composition-api-typescript