Chapter 1 - Art
Related links: Blender file, glTFs
Introduction: Carlos
To start, Carlos (the 3D artist) spent a good amount of time talking to Diane (the Babylon developer) to make sure they were on the same page regarding what features the art should have. Both were of the opinion that the visuals should be directly dictated by the art as much as possible; in other words, as much as possible, art decisions should be made by an artist in art tools, not by a programmer in programming tools. Thus, they ultimately decided that following major components should be controlled from within the art assets:
- The look and behavior of the main watch asset itself.
- The appearance of all configuration options.
- The motion of the cameras, as much as possible.
- In non-interactive "matchmoving" states, the full motion of the camera should be specified in art.
- In the interactive "arc-rotate" state, key parameters for the camera such as starting position and focus point should be specified in art.
- The location and visibility of "hotspots" -- elements of the 3D scene
that might be tagged/tracked by 2D UI (labels, etc.).
- The position of the hotspots would always be specified by art.
- In non-interactive "matchmoving" states, the visibility of the hotspots could be fully specified by art because of certainty about the position of the camera.
- In the interactive "arc-rotate" state where the camera could move unpredictably, art would specify key parameters that could then be used by the interactive experience to decide whether a hotspot was visible or not.
That feature list also doubled as a pretty decent roadmap; so, with a plan in place, Carlos got started by creating...
The Main Watch Asset
Dev Stories are not implementation guides or tutorials, so the precise details of how Carlos modeled the main watch asset are beyond the scope of this narrative. Instead, this section will provide high-level perspective on the key decisions and implementation choices Carlos made while creating the main Vaporwear watch asset.
-
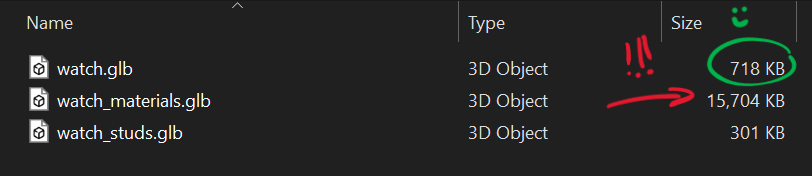
File size: The design for the Vaporwear site dictates that a 3D rendering should be the first thing a user sees when the site starts up. To make this happen, the 3D model used in that first rendering must be small; otherwise it won't download quickly enough for the site to start in a timely manner. Consequently, file size (as the determining factor of download time) became a key concern for the main watch asset. This was the primary motivation for deciding that the main asset (which was all that was needed for the initial rendering) and additional assets (configuration options, etc.) should be packaged as separate files which could be downloaded at different times. That way, larger assets (sophisticated materials, etc.) could be included in the secondary files while still allowing the main asset file to remain as small as possible.
-
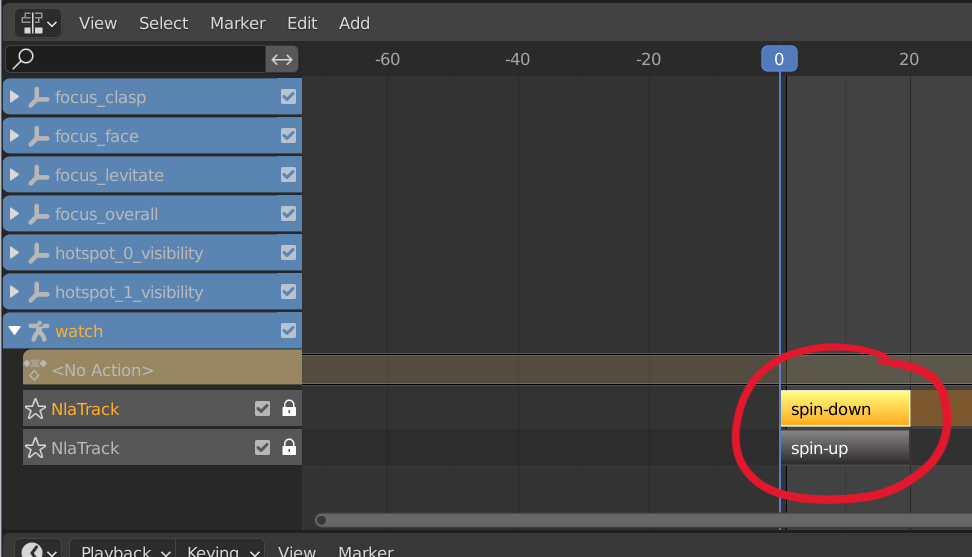
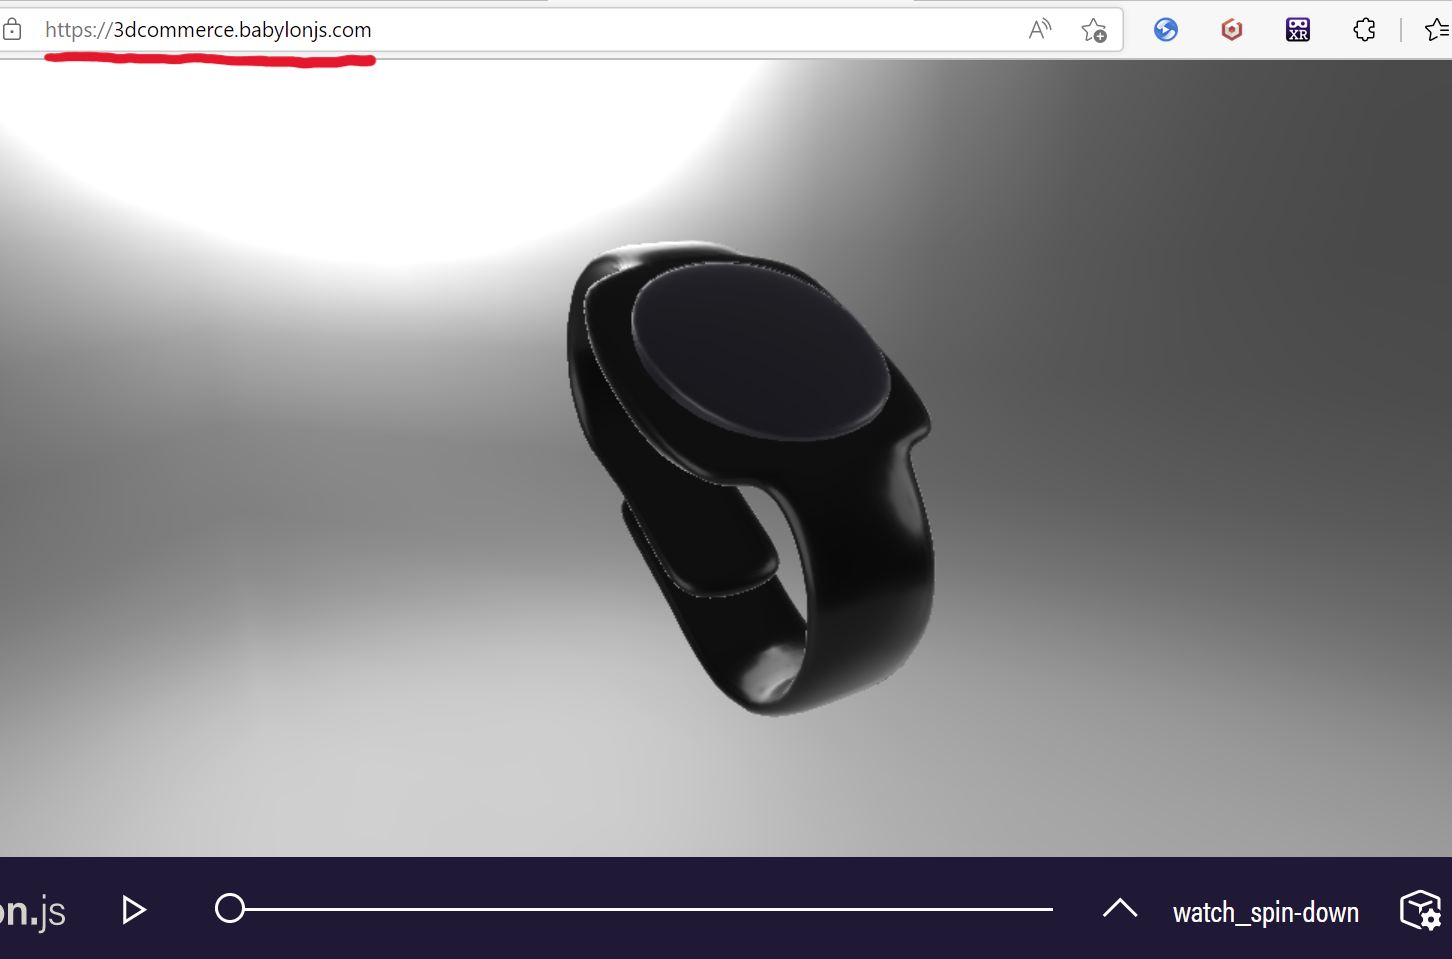
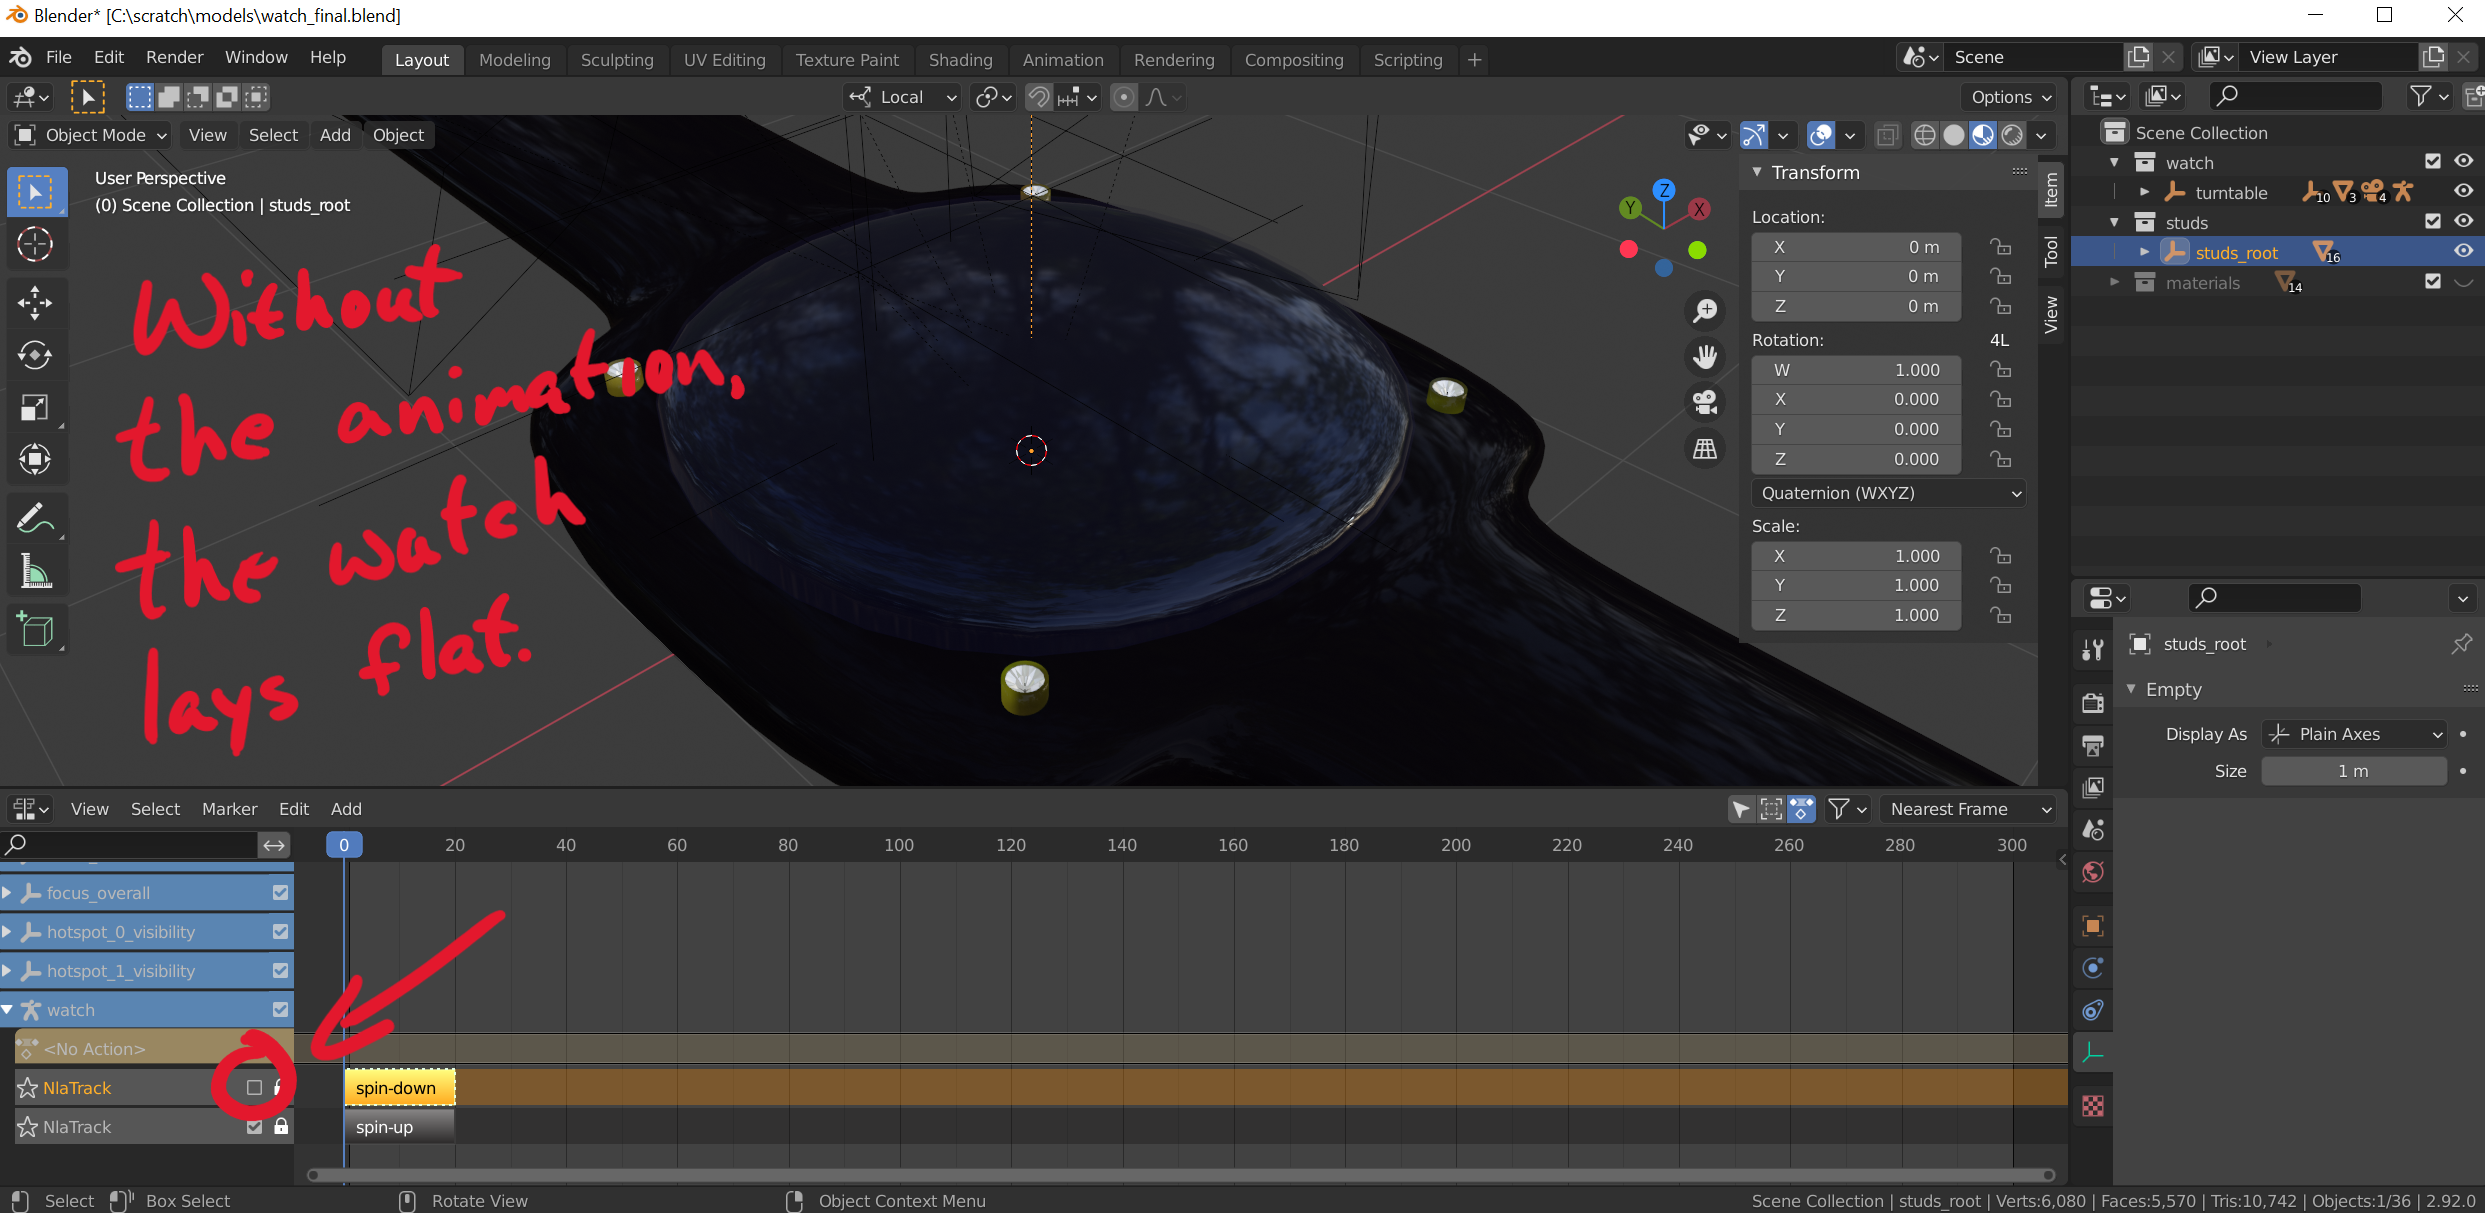
Animations: In different parts of the site, the watch was supposed to adopt two different poses: wrapped "up" as though on a wrist and laid "down" flat as though on a table. To transition between them, the watch would need to animate. While he could have used any animation mechanism supported by glTF (the file format he'd agreed on with Diane), he chose to simply rig the watch and give it two animations: one to go "up" and one to go "down." He even added a little spin to the animation, just for style.
-
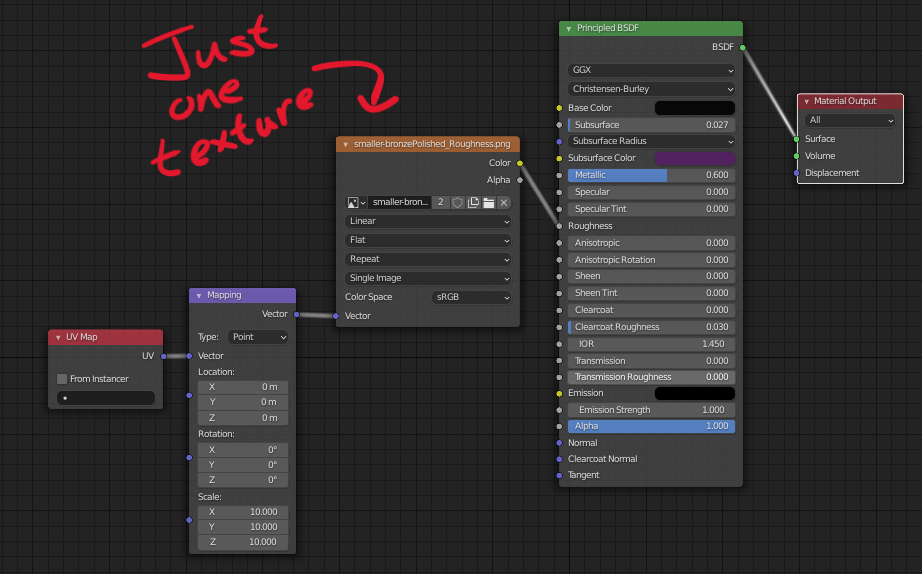
Materials: While a key goal of main asset was to stay small by leaving most of the materials to be downloaded later in another file, the main asset still needed to include the minimum number of materials it needed to render. Carlos took special care to make sure the materials included with the main asset were as small as possible while still looking good.
-
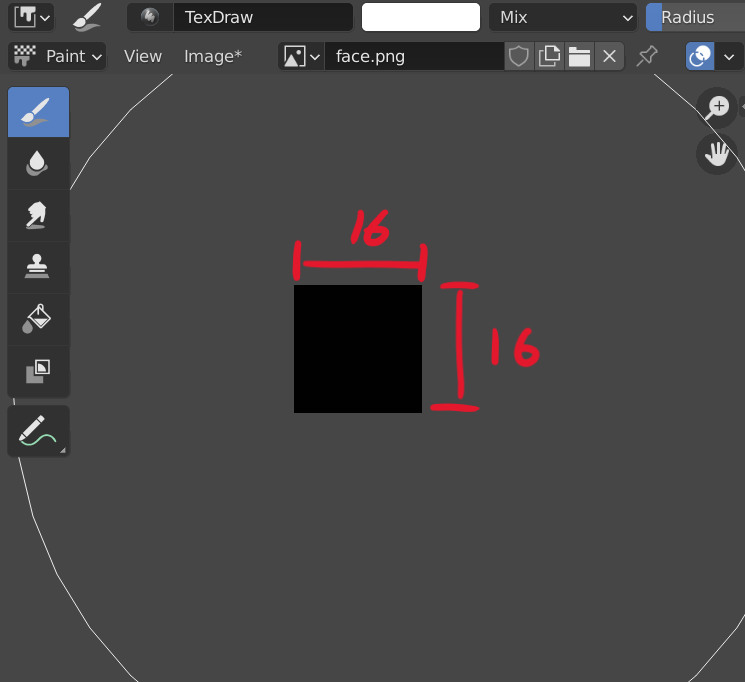
Watch Face: The face of the watch was supposed to be dynamic, showing the actual time, and Diane had told the team she would take care of that in code using Babylon's GUI textures. Carlos still needed to provide a material for the watch face, but texture within it (specifically the emissive texture) would simply be replaced, he knew, by the GUI texture Diane would generate at runtime. Thus, he could make the provided watch face texture as small and useless as he wanted to since it would never be seen in the rendering anyway.
While working on the main asset, Carlos periodically wanted to check that the asset would render the way he expected it to in the final experience. (The various previews available in Blender, his tool of choice, often rendered things differently than a 3D Commerce-certified renderer would.) The best way he found to see how the model would actually render was to export it to a GLB, then drag-and-drop that GLB (along with his intended IBL lighting) into Babylon's 3D Commerce-certified version of the Sandbox. Not only would this render the model in a standard way, but it would actually render it using Babylon.js, meaning that the code rendering the model in that Sandbox would be the same code rendering the model in the real experience on the Vaporwear site. Thus, by viewing his model using that Sandbox, he could be sure he was seeing the model (animations and all) the same way that customers eventually would.
Note that the main asset's visuals weren't the only things that would be included in the main asset file; small amounts of data for camera motion and hotspots would also need to be included, as will be discussed later. However, Carlos didn't want to tackle those features until he'd finished with the visuals, so once he had the main asset built he moved on to creating the configuration options.
Configuration Options
The configuration options for the Vaporwear smartwatch were essentially all the ways customers could customize it, so Carlos had to work closely with Allan from Vaporwear to make sure all the options were representable and looked correct. The available options were as follows:
- Users could choose from several types of watch bands.
- Users could choose from several tints/finishes for the watch face.
- Users could choose to add four gemstone "studs" to the watch.
- If the users had added studs, they could choose from several colors of gemstones.
- If the users had added studs, they could chose from several different metals for the bezels.
From an art perspective, these options boiled down to two underlying operations:
- Adding separate geometry to the scene (if users chose to add studs).
- Swapping the materials on geometry within the scene.
Allan also told Carlos that Vaporwear might add new stud configurations later, or new kinds of bands, etc., and that he should design his approach to the art with that in mind. For this reason, Carlos decided to have the additional "stud" geometry in its own file, then have another file essentially full of nothing but materials; that way, more additive geometry or additional materials files could be added later on by just continuing the pattern established while making the first batch of assets.
"Studs" Additive Geometry
Creating the "studs" asset was quite straightforward, with only a few noteworthy "tricks."
-
Animation: The "studs" asset would be imported separately from the main asset, but visually it needed to be attached to the main asset, including while animating. In order to make this work (without Diane having to change a bunch of offsets in code later, which would involve making art decisions), all Carlos needed to do was model the studs in the correct position relative to the watch's position when no animation was applied. Because Carlos had initially modeled the watch flat, then rigged it and animated it from there, this meant he needed to model the studs in the right position relative to the watch when it was flat. As long as he got that offset right, all Diane would have to do later would be to attach the studs to the correct bone of the watch's skeleton, and the studs should correctly position themselves and animate as the watch's skeleton animates.
-
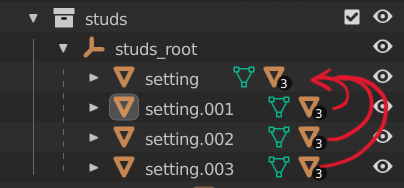
Instancing: The four "studs" were identical, and this provided an opportunity for Carlos to give a little boost to the eventual rendering performance of the asset. Instancing is a technique that allows renderers to render multiple copies of identical meshes very efficiently, and from Blender it's easy to specify instancing by simply creating a linked object, so Carlos did that with the studs in order to help them render more efficiently.
-
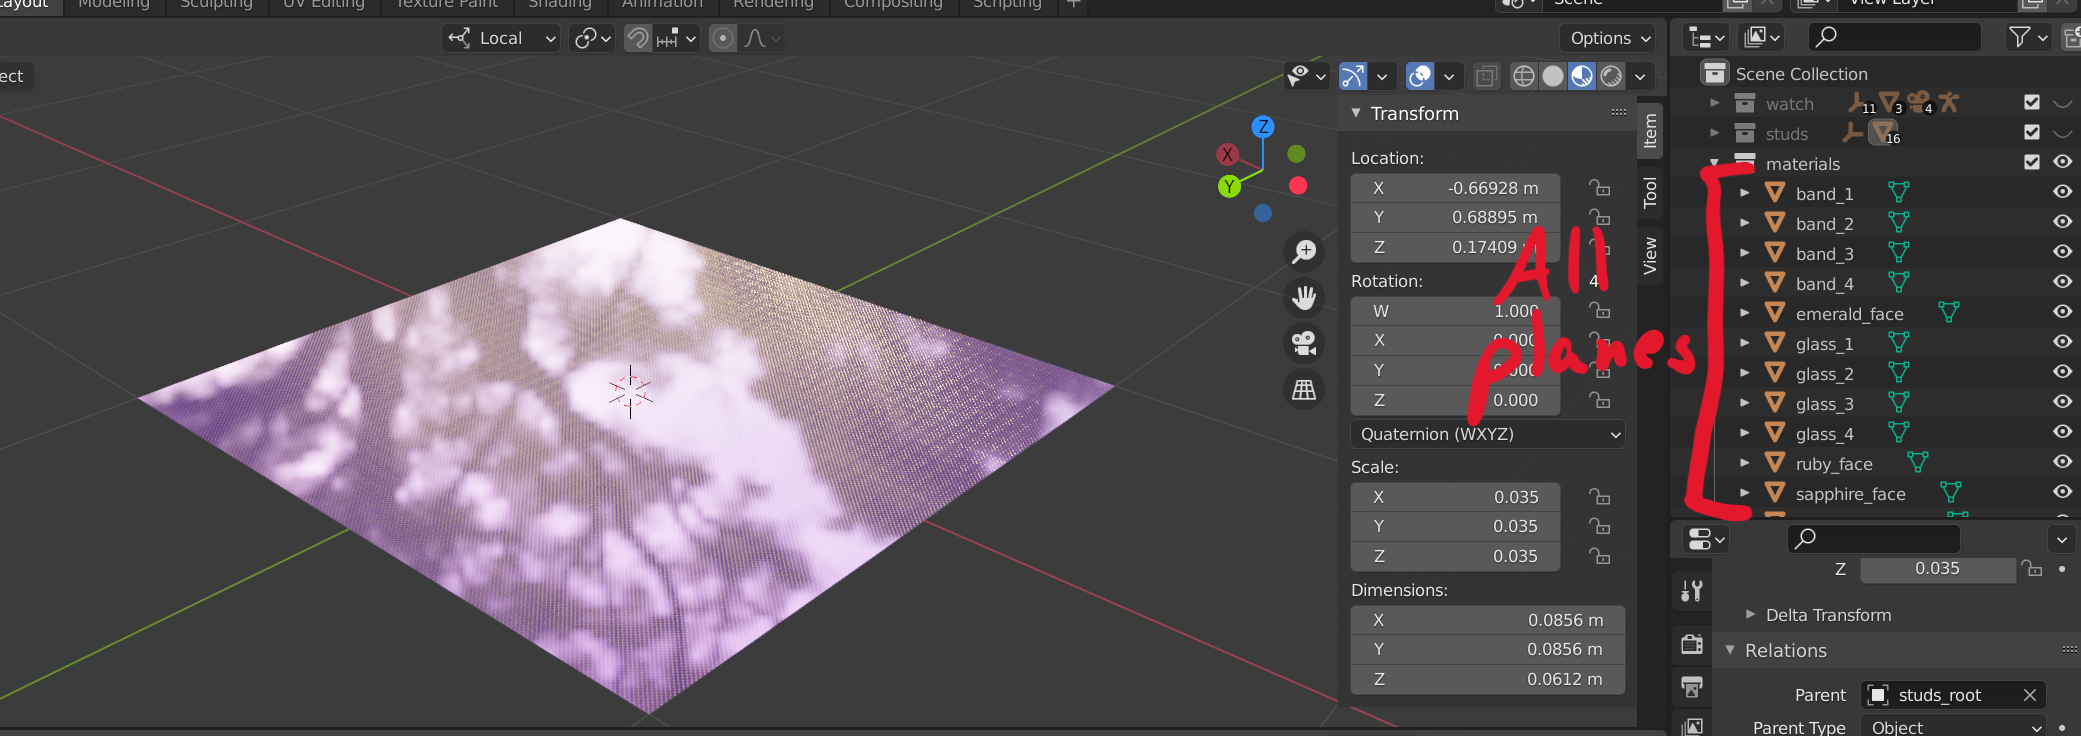
Materials: As with the main asset, the "studs" asset was created to contain specific geometry, not a materials collection, so Carlos included in it only one of each kind of material it used -- one gemstone material, one bezel material -- to serve as the default materials for the geometry. Additional materials would be used for material-swap configuration, and so they would be included alongside other additional materials in a dedicated additional materials file.
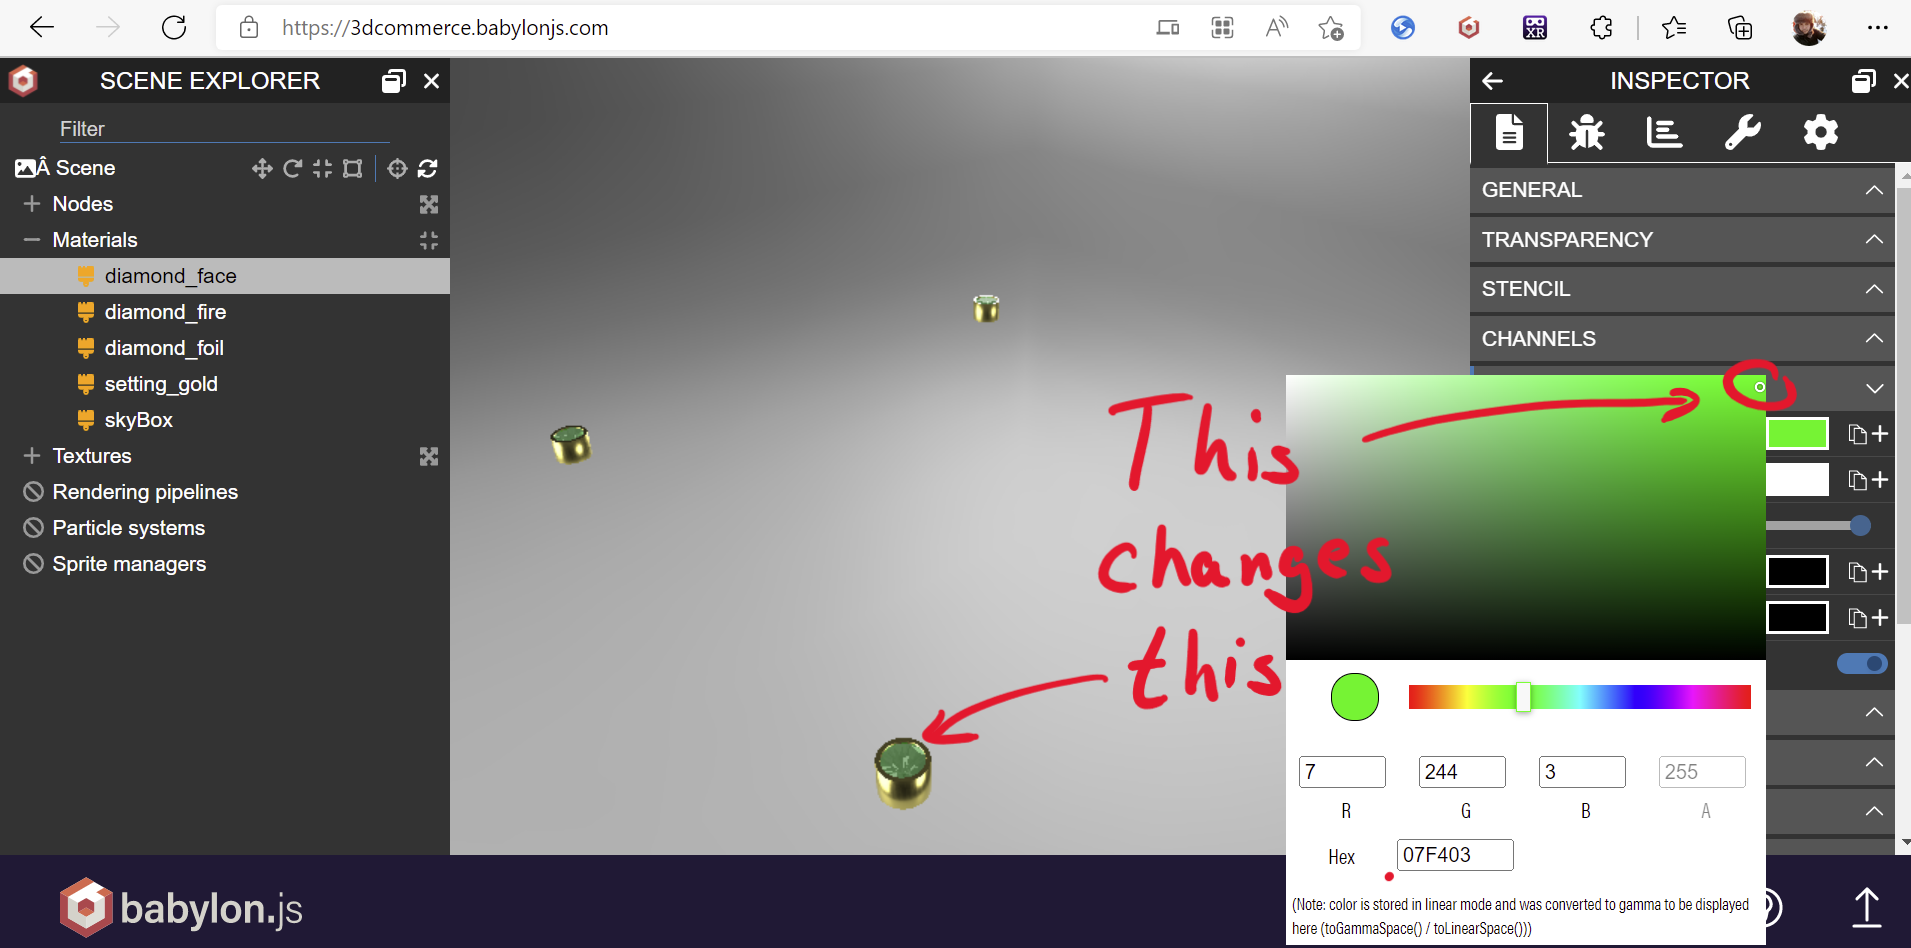
Again, the best way for Carlos to know for sure how his model would render was to export to GLB and view it in Babylon 3D Commerce-certified Sandbox. He was even able to use the Inspector to modify the gemstone material as a preview of what it would look like with another material.
Additional Materials File
The materials are, very often, the most important factor in determining how a rendered model looks; they are also, very often, by far the largest piece of the file size of a 3D asset. Several of the materials Vaporwear wanted as configuration options, particularly for the watch band, were very high-quality and consequently very large. Because these materials were bundled into a separate file just for materials, they thankfully wouldn't delay the experience as they could be downloaded asynchronously in the background. Even so, Carlos remained mindful of the file size and used what tricks he could to minimize the megabytes without sacrificing visual quality.
-
Geometry: The easiest step to keep the file size small was to make sure that the geometry in the materials file was minimal. Geometry wasn't the point of that file -- the only reason it had geometry was so that the materials could go on something -- so Carlos kept the geometry to minimalistic single-quad planes. This didn't have much impact on the file size as geometry in general tends to be far, far smaller than textures, but it was still better to not waste space.
-
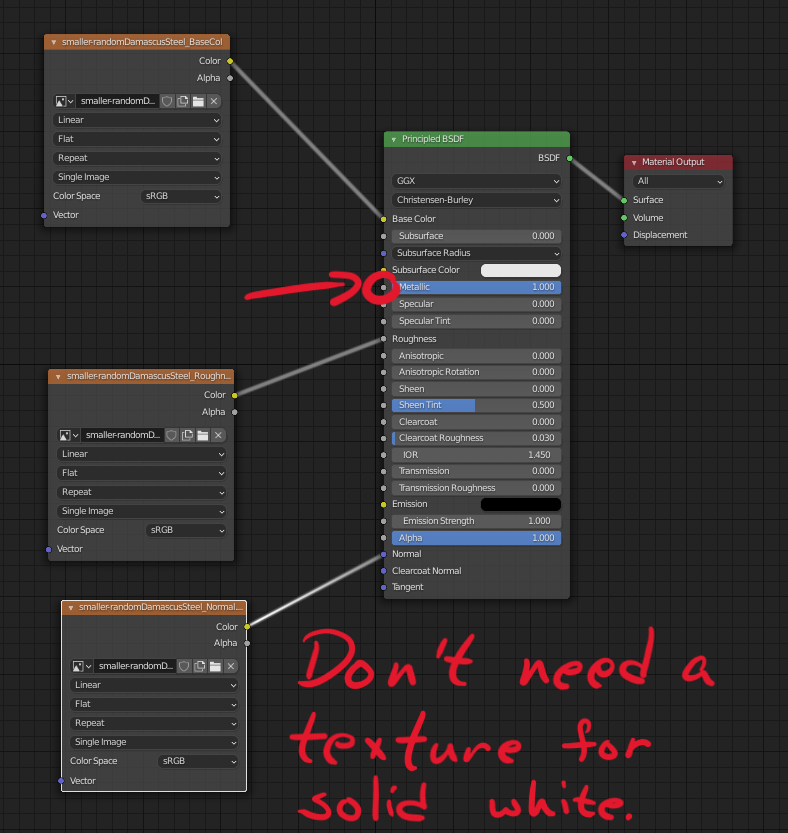
PBR parameters: A much more impactful measure was to exclude certain textures when those textures could effectively be replaced by set parameters. For example, some of the materials Vaporwear wanted for their watch bands originally came with PBR textures that were effectively all one solid color. Carlos was able to exclude textures like these entirely by just setting his material to use a constant value instead of the texture. He double-checked with Vaporwear that doing this didn't impact the rendering negatively, but in every case they were unable to discern a difference.
-
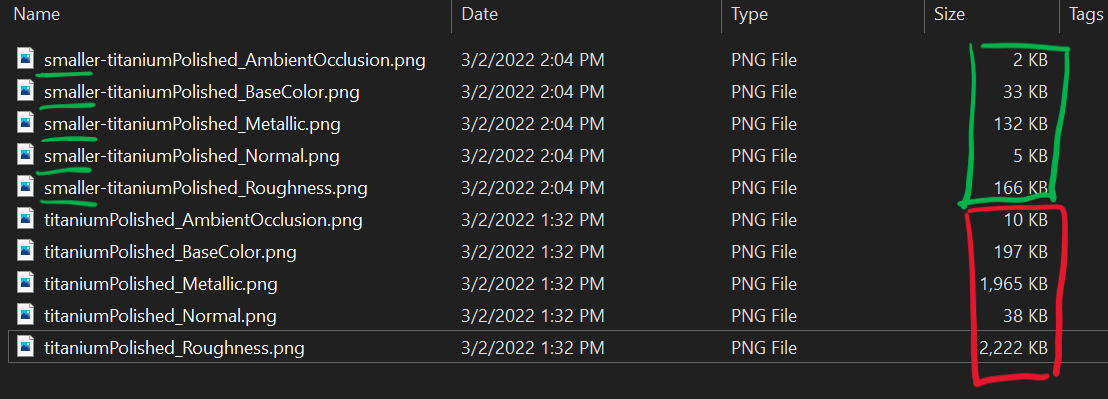
Texture resolution: The last and most powerful trick Carlos used to manage file size was to change the resolution of the PBR textures. He had to be careful about doing this because this very easily could degrade the quality of the visuals by losing fine details. However, many of the materials were never expected to be viewed from very close, and ultimately Carlos was able to reduce the resolution of every material texture by at least some amount.
-
(Addendum: Another trick that can also be worth trying is using JPEGs instead of PNGs for the texture files. This is a trick that must be used cautiously as JPEG compression can sometimes degrade the quality of the texture in problematic ways; but when it works, especially on larger textures, it can provide significant size advantages. This is mentioned as an addendum because Carlos probably should have tried it alongside his other optimization techniques, but he didn't because, as it happened, he simply didn't think of it.)
Even with all these tricks, the additional materials file ended up weighing in at a whopping 15 megabytes, far too large to load in the foreground of a Web experience, but acceptable for loading in the background. As before, Carlos double-checked how the materials would render using Babylon's 3D Commerce-certified Sandbox. With the materials finished, he'd now completed all of the art work that could be looked at; next he needed to decide how the art should be looked at.
Camera Motion
The new Vaporwear experience needed two types of camera motion: non-interactive "matchmoving" camera motion comparable to a camera "on rails"; and interactive "arc-rotate" camera motion which would allow the user to look at the model from different angles at will. Though these two types of motion required different parameters, both were relatively easy for Carlos to set up in Blender.
-
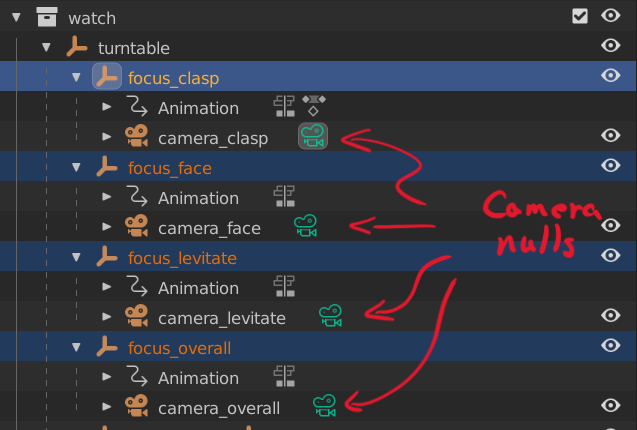
To create the "matchmoving" camera motion, all Carlos had to do was add an empty transform (sometimes called a "null") to his scene and create an animation that moved it in the way he wanted the camera to move. He even found that he could attach a Blender camera to the moving node, allowing him to see the motion directly, and that camera would be exported to glTF simply as the empty transform he needed. The Vaporwear experience contained four different states with "matchmoving" camera motion, so Carlos ended up with four named empty transforms, each with an animation that moved it.
-
Creating the parameters for the "arc-rotate" camera state was not as precise -- the camera in that state was interactive, so its motion could not be fully specified by art -- so all Carlos had to decide was the starting position for the camera and its center of focus. For the latter, he created another named empty transform to mark the point around which he wanted the camera to orbit; and as for the starting position he actually wanted it to be the same as the starting position for one of the "matchmoving" camera motions, so the same empty transform that provided the position for that "matchmoving" state also served to specify the starting position for the "arc-rotate" state.
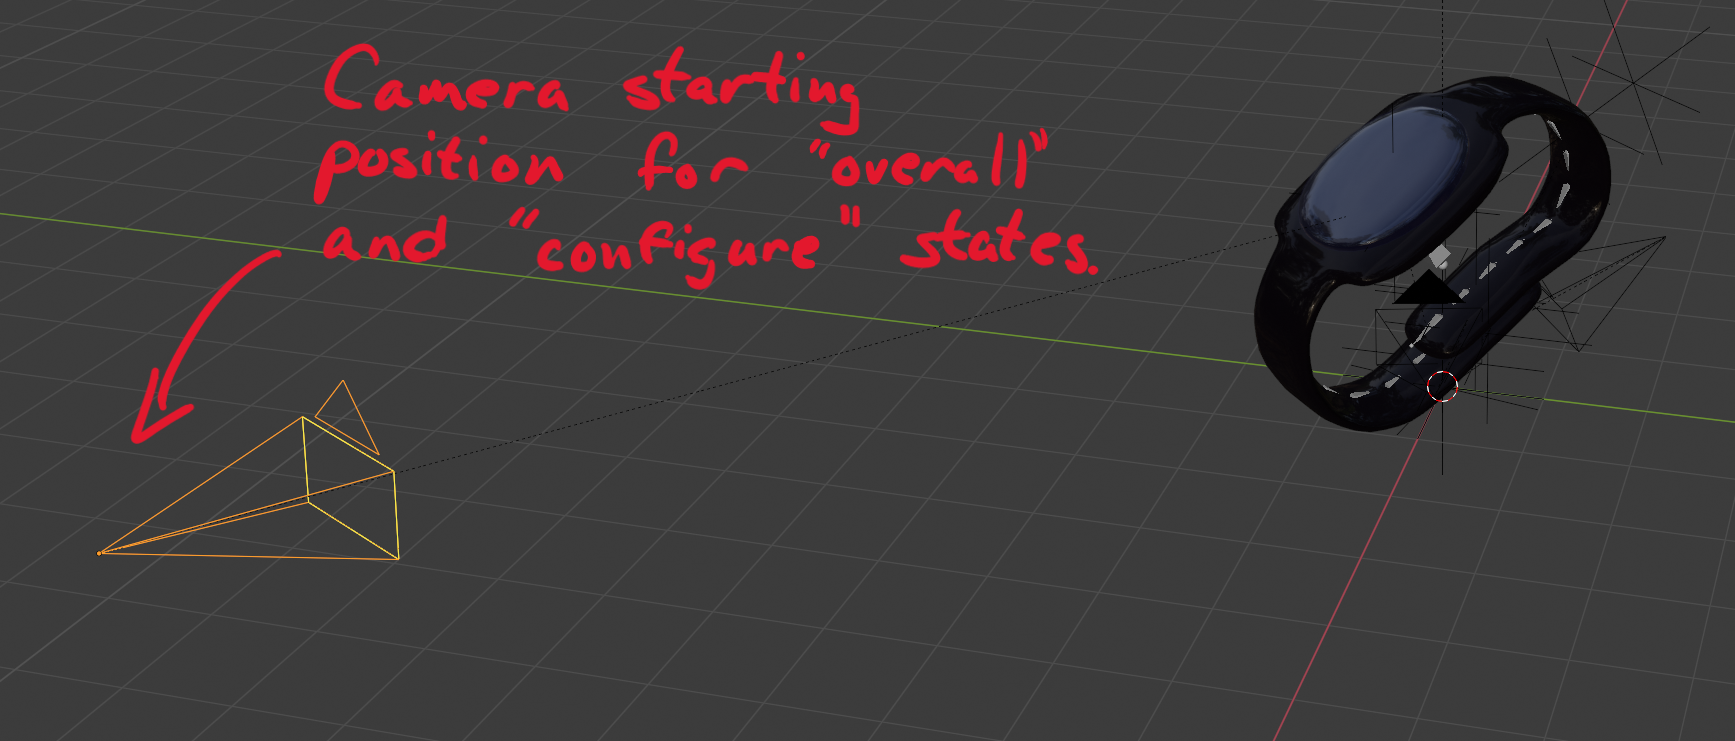
An important note is that these camera motions were exported as part of the main asset GLB, not additional geometry or materials GLBs. This was necessary because, in the experience design, the camera starts moving as soon as the watch is visible, so the camera movement animations needed to be available as part of the main asset. Thankfully, this kind of data is small in file size, so adding the camera motion empty transforms and animations to the main asset was not a problem.
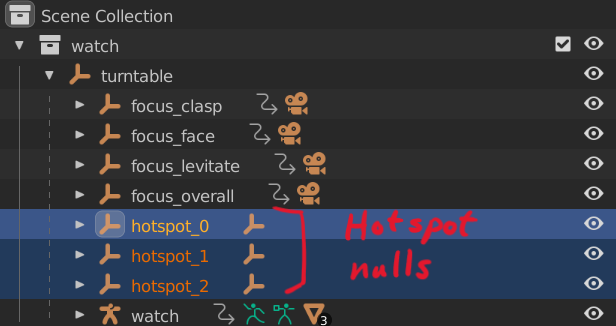
Hotspots
Hotspots are points of interest in the 3D scene that can be tracked so that 2D UI (markers, labels, etc.) can be connected to specific locations in the 3D scene.
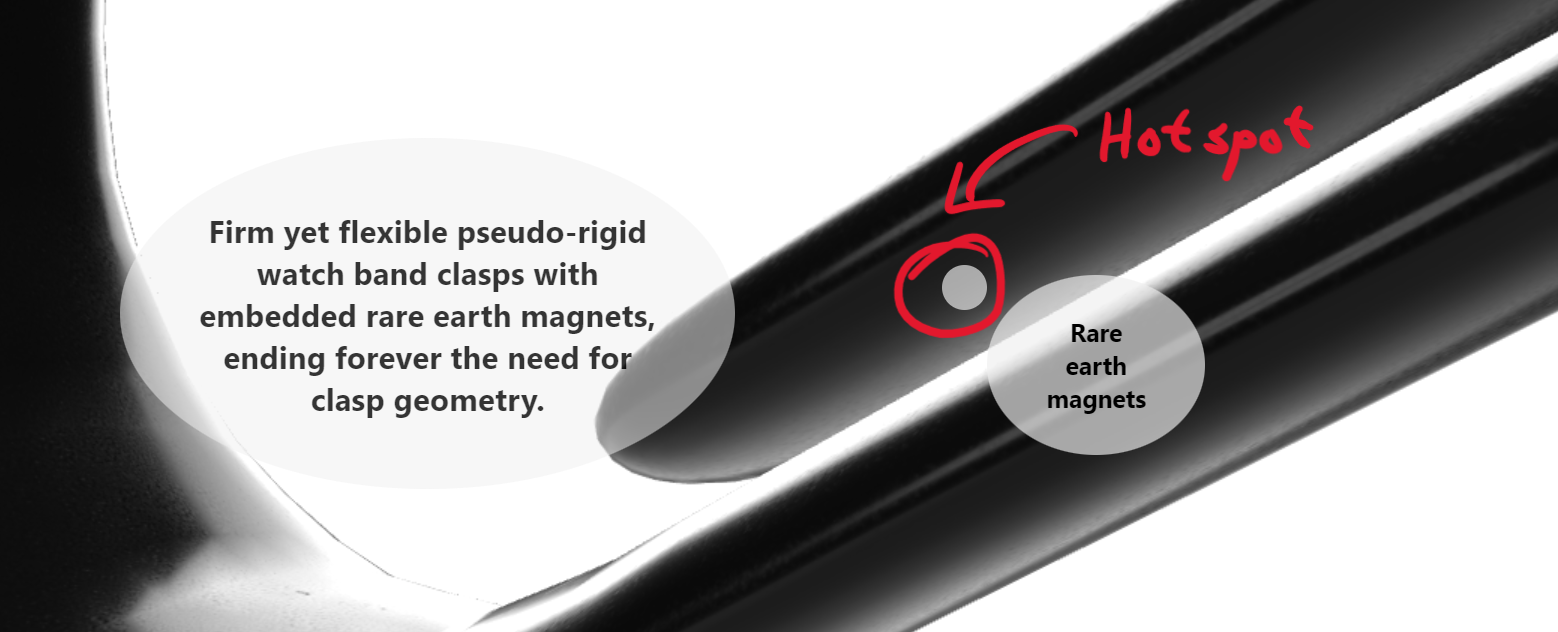
The design for the Vaporwear site featured three hotspots, two of which would be visible during a "matchmoving" state and one of which would be visible during the "arc-rotate" state. Doing the actual tracking that would turn these 3D points of interest into 2D hotspots was for Diane to do in Babylon code; all Carlos had to do was specify where these hotspots were and when they should be visible.
-
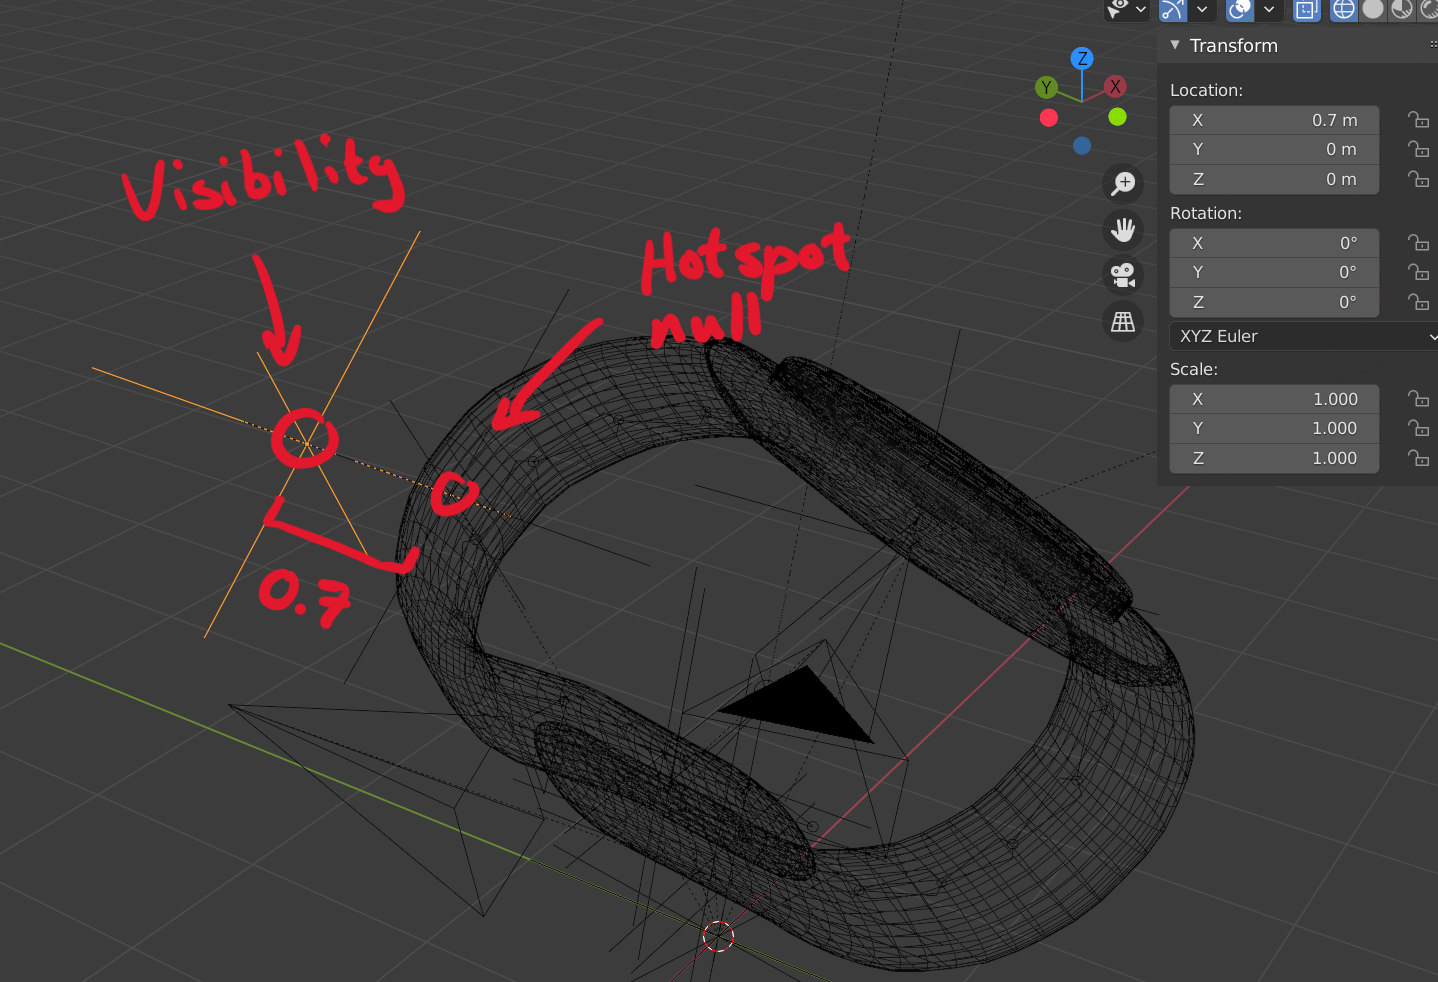
Specifying location for the hotspots was easy: for each of the three, Carlos simply created a named empty transform to mark the point of interest.
-
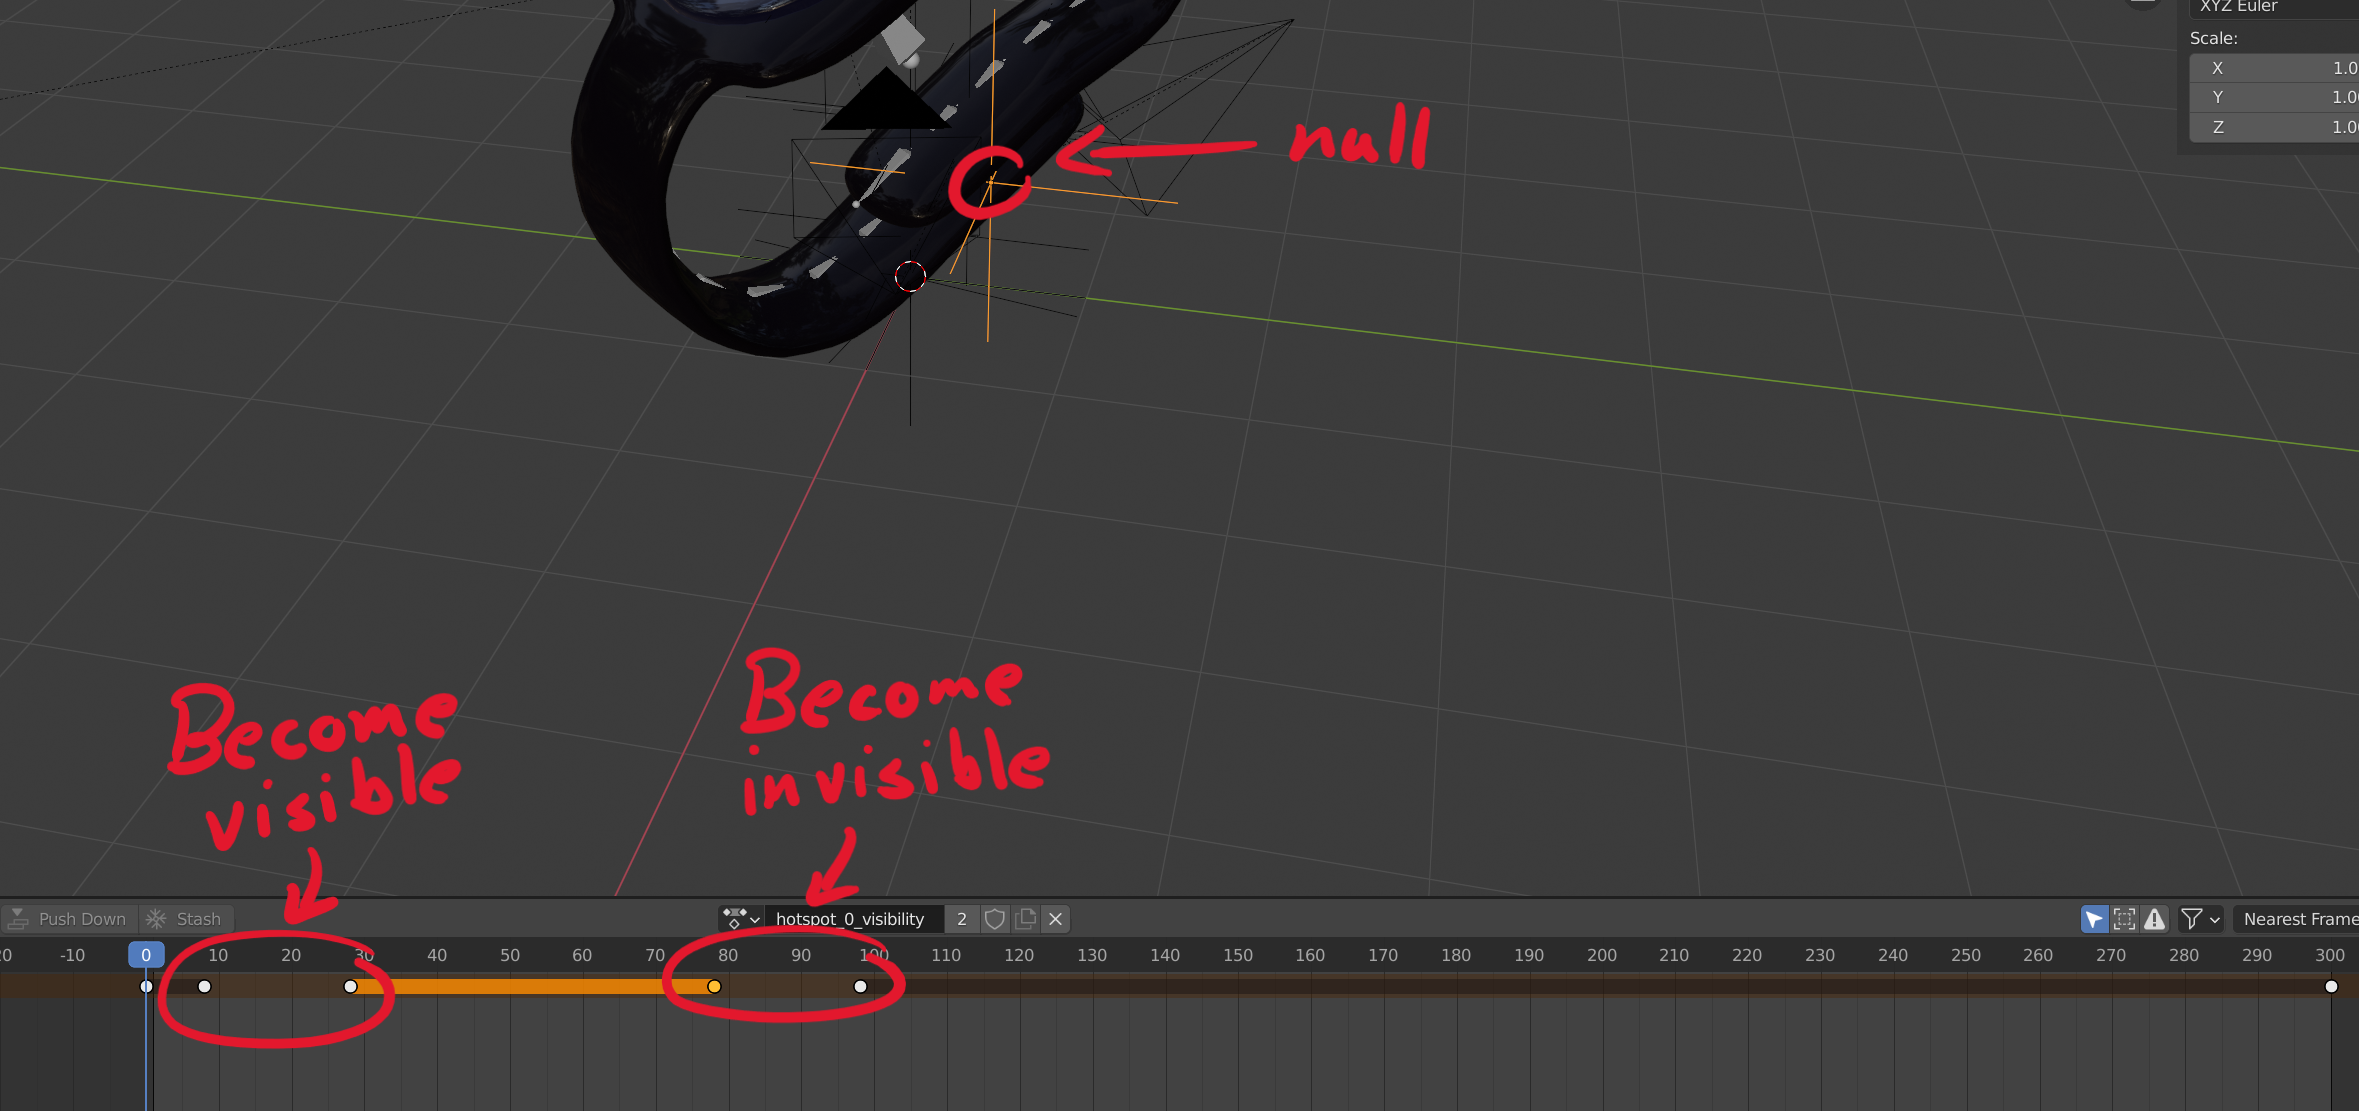
Specifying visibility for the hotspots in the "matchmoving" state was also simple. Because the motion of the camera was fully determined by an animation in these states, Carlos could also characterize when each hotspot would be visible using an animation. Under each hotspot, he added another named empty transform, then created an animation to move that transform along the X axis to indicate visibility. If the empty transform's local position's X value was 0, then the hotspot was not supposed to be visible; and if the X value was 1, then the hotspot was supposed to be visible. Thus, as long as the hotspot animation was synchronized with the camera movement animation, Diane would simply have to check the visibility indicator's local position to determine whether the hotspot was visible or not.
-
Specifying visibility for the hotspot in the "arc-rotate" state had to be done differently because the camera's motion in that state would be driven by the user, not by an animation. Carlos and Diane considered several different ways to characterize visibility, and what they ultimately decided on was to use a thresholded dot product to describe a "cone" within which the hotspot would be visible: if the dot product between the direction from the hotspot to the camera and the null's X axis was below a certain threshold, the hotspot would be considered invisible. Once again, Carlos added a named empty transform parented to the hotspot itself and used the local X position of that transform to specify the dot product threshold.
As with the camera motions, these hotspot parameters were added to the main asset file: they were very small and could be needed very early in the experience. With the addition of these hotspots, Carlos now had all the art features needed for the Vaporwear experience; and after checking one last time in Babylon's 3D Commerce-certified Sandbox that all three GLBs included everything they should have (and only what they should have) and rendered the way he wanted, Carlos passed the GLBs along to Diane to be incorporated into the 3D part of the new Vaporwear site.