Creating a Bowling Scene with the Havok Physics Plugin
Have you ever wondered how physics can bring a virtual bowling game to life? Well, you're in for a treat! In this tutorial, we'll explore using the Havok Physics engine to create a simple bowling scene which simulates bowling ball movement and pin interactions. If you’re new to using physics with Babylon.js, then this tutorial is for you! We’ll create the scene in the Babylon.js Playground and use assets available in the Asset Librarian. So, let's lace up our virtual bowling shoes and get started!
Create the Scene
Let’s first create a new playground. We can get rid of the sphere and ground within the scene since we later add our own assets. Before moving onto the next step, be sure that your code doesn’t include the sphere or ground.
var createScene = function () {    // This creates a basic Babylon Scene object (non-mesh)    var scene = new BABYLON.Scene(engine);
    // This creates and positions a free camera (non-mesh)    var camera = new BABYLON.FreeCamera("camera1", new BABYLON.Vector3(0, 5, -10), scene);
    // This targets the camera to scene origin    camera.setTarget(BABYLON.Vector3.Zero());
    // This attaches the camera to the canvas    camera.attachControl(canvas, true);
    // This creates a light, aiming 0,1,0 - to the sky (non-mesh)    var light = new BABYLON.HemisphericLight("light", new BABYLON.Vector3(0, 1, 0), scene);
    // Default intensity is 1. Let's dim the light a small amount    light.intensity = 0.7;
    return scene;};
Since we’re creating the scene in the Playground, save the scene and copy the URL so that you can save incremental updates throughout the tutorial.
Enable Physics
To bring our scene to life with realistic physics, Babylon.js provides a powerful function called enablePhysics. This essential function serves as the gateway to integrating physics into our scene. By invoking enablePhysics, we enable dynamic physics simulation for our objects, allowing them to respond to forces and collisions realistically. This function is necessary for creating a scene with physics because it sets the stage for objects to interact with each other in a lifelike manner. From simulating the movement of a bowling ball as it rolls down the lane to accurately calculating the collision response between the ball and the pins, enablePhysics is the key that unlocks the potential for immersive and interactive experiences.
Let’s enable the physics engine just below the code for light intensity. The enablePhysics function takes two parameters: gravity and plugin. We create a variable for each parameter and pass them each into the function. For gravity, we use the vector (0, -9.81,0) which reflects real Earth gravity. As for the plugin, we assign the HavokPlugin.
var gravityVector = new BABYLON.Vector3(0, -9.81, 0);var physicsPlugin = new BABYLON.HavokPlugin();scene.enablePhysics(gravityVector, physicsPlugin);Now that physics is enabled, let’s create our bowling lane!
Create Bowling Lane
The bowling lane is considered the ground in our scene. We want to provide a thin long platform for both the pins to sit and the bowling ball to roll. Using MeshBuilder, we create the lane and assign the width and height parameters, 6 and 20 respectively.
const lane = BABYLON.MeshBuilder.CreateGround("lane", { width: 6, height: 20 }, scene);We also position the lane further ahead on the z-axis by 4 to provide a more full view of the lane without moving the camera.
lane.position = new BABYLON.Vector3(0, 0, 4);Now that we have a bowling lane, we add physics to the lane since both the ball and pins need to collide with the surface. By not adding physics to the lane, our ball and pins would fall through the ground! To add physics, we create an aggregate. The Physics Aggregate is a helper that allows creating all the objects necessary to physicalize the scene in just one call.
const laneAggregate = new BABYLON.PhysicsAggregate(lane, BABYLON.PhysicsShapeType.BOX, { mass: 0 }, scene);The aggregate contains both a body and a shape. Since we’re adding physics to the lane, the lane is the body. As for the shape, we need to ensure that the shape matches the body. Given the lane closely resembles the shape of a box, we use the BOX shape. We also make use of the PhysicsAggregate Parameter – Mass. Since the lane lies flat against the virtual ground, we assign no mass (or 0). Otherwise, the lane would fall into the abyss of the scene!

Create Bowling Pins
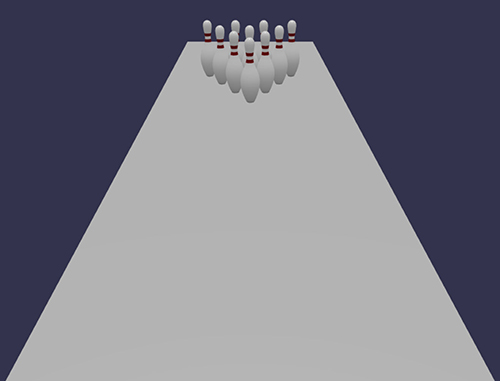
With our bowling lane created and configured with physics, we add pins to sit on top of its surface. A standard bowling lane consists of 10 bowling pins. Rather than write the same code 10 times to create each bowling pin, we create a function createPins which uses the InstancedMesh method to create a an instance of 10 pins. The InstancedMesh method allows for efficient rendering of multiple instances of the same mesh with varying positions or properties. This is quite the function so let’s break it down!
We first start by loading the bowling pin from the Asset Librarian. Once loaded, we set the scaling of the pin to a size that’ll fit well within our lane dimension but also accommodate 10 pins. Given the lane dimensions, we scale the bowling pin 0.3.
async function createPins(scene) {    const result = await BABYLON.SceneLoader.ImportMeshAsync("", Assets.meshes.bowlingPinpin_glb.rootUrl, Assets.meshes.bowlingPinpin_glb.filename, scene);            const bowlingPin = result.meshes[1];            bowlingPin.scaling = new BABYLON.Vector3(0.3, 0.3, 0.3)}
createPins(scene);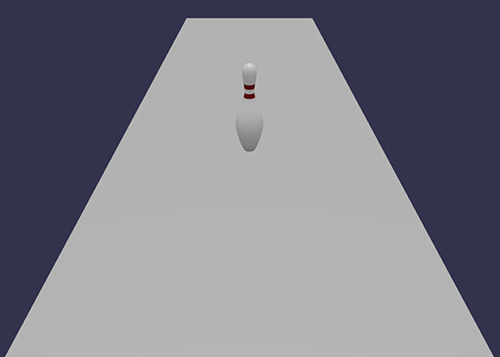
Because we’re creating instances of the loaded bowling pin mesh, we disable the initial pin which hides the pin from view.
bowlingPin.setEnabled(false);Since we can change the position for each instanced pin, we need a way to both store and later reference all positions. To do so, we create an array pinPositions to store all pin positions. The position is based on the scale of the pin. Therefore, if you choose a scale different than `0.3``, adjust the x and z values of the pins accordingly.
pinPositions = [ new BABYLON.Vector3(0, 0, 5), new BABYLON.Vector3(.5, 0, 6), new BABYLON.Vector3(-.5, 0, 6), new BABYLON.Vector3(0, 0, 7), new BABYLON.Vector3(1, 0, 7), new BABYLON.Vector3(-1, 0, 7), new BABYLON.Vector3(-1.5, 0, 8), new BABYLON.Vector3(-.5, 0, 8), new BABYLON.Vector3(.5, 0, 8), new BABYLON.Vector3(1.5, 0, 8)]We now iterate over the pinPositions array using the map() method. For each position in pinPositions, a new bowlingPin instance is created. Each new pin’s name is given the prefix pin followed by the corresponding index. The instanced pin’s position is then assigned based on the corresponding position value from the pinPositions array.
return pinPositions.map(function (positionInSpace, idx) { const pin = new BABYLON.InstancedMesh("pin-" + idx, bowlingPin); pin.position = positionInSpace; return pin;});Before we return the instanced pin, we need to add physics to the pin. Like adding physics for the bowling lane, we create an aggregate for the pin. However, this time we use the CONVEX_HULL shape which matches the visual geometry as best as possible. We assign a mass of 1 to the pin so that there’s just a bit of weight but not too much that the pin can’t be knocked down. In addition, we use the restitution parameter which refers to how bouncy or springy an object is when it collides with another object. Bowling pins are made of wood and therefore when a pin collides with another object, the pin should “bounce” just a tad but not so much as though the pin is made of rubber. Therefore, a restitution of .25 will suffice!
const pinAggregate = new BABYLON.PhysicsAggregate(pin, BABYLON.PhysicsShapeType.CONVEX_HULL, { mass: 1, restitution: 0.25 }, scene);With the pin instanced and then returned, we call the createPins() function passing the scene into the function call. At this point, we have 10 pins instanced in the shape of a triangle!
Create a Bowling Ball
With our bowling lane created and our pins perfectly placed, we’re ready to create the bowling ball! We load the bowling ball from the Asset Librarian and scale to .2. In addition, we position the ball at (0, 0.5, -5) which centers the ball at the opposite end of the bowling lane.
async function createBall(scene) {    const result = await BABYLON.SceneLoader.ImportMeshAsync("", Assets.meshes.bowlingBall_glb.rootUrl, Assets.meshes.bowlingBall_glb.filename, scene);        const bowlingBall = result.meshes[1];        bowlingBall.scaling.scaleInPlace(0.2);        bowlingBall.position = new BABYLON.Vector3(0, 0.5, -5);}
createBall(scene);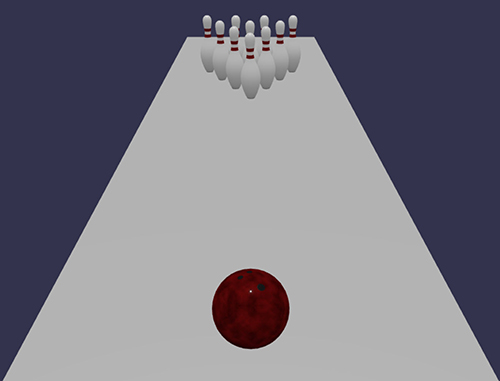
Now that our bowling ball is in place, we add physics to the ball. However, this time we choose the SPHERE shape given the balls rounded shape.
const ballAggregate = new BABYLON.PhysicsAggregate(bowlingBall, BABYLON.PhysicsShapeType.SPHERE, { mass: 1, restitution: 0.25 }, scene);We’re going to simulate aiming and rolling the ball down the lane later by adding keyboard input. Since both forms of movement are manually initiated by key input, we need to modify default behavior that Babylon.js performs for physics objects.
Before an actual physics simulation takes place, Babylon.js performs a pre-step computation which handle various tasks such as updating the object’s position and velocity based on external forces, applying constraints, and resolving collisions. These calculations help ensure accurate and stable physics simulations.
However, we want to manually control the bowling ball’s motion – whereas the bowling ball only moves when a key is pressed. Therefore, we set disablePreStep to false. In doing so, Babylon.js skips the pre-step computation for the bowling ball which allows us to directly manipulate its position and velocity without interference from the built-in calculations.
ballAggregate.body.disablePreStep = false;Add and Configure Keyboard Input
The final step in our tutorial is to add keyboard input to both move the position of the bowling ball for optimal aim and roll the ball down the lane - hopefully for a strike! We add this functionality within the function callback for the bowling ball. Using the onKeyboardObservable method, we check for a KEYDOWN event. Essentially, when the appropriate key is down, an action occurs. Let’s first start with moving the bowling ball’s position left and right.
scene.onKeyboardObservable.add((kbInfo) => {    switch (kbInfo.type) {        case BABYLON.KeyboardEventTypes.KEYDOWN:            switch (kbInfo.event.key.toLowerCase()) {
            }        }    });
For typical keyboard game play, the A and D keys are used for left and right movement, respectively. Since we’re only moving the bowling ball to the left and right, we change the ball’s x position when the key is pressed. We don’t want to change the position too much per key press, therefore, we decrement and increment 0.1 on the x-axis.
case "a": bowlingBall.position.x += 0.1; breakcase "d": bowlingBall.position.x -= 0.1; breakAs for rolling the bowling ball down the lane, we need to apply an impulse to the ball in the direction of the bowling pins. To do so, we use applyImpulse on the body for the ball aggregate that was created when we added physics to the bowling ball. When applying an impulse, we need to provide an impulse vector (or the direction of the impulse) and the location of the impulse. The direction of impulse is going to be in the direction of the bowling pins – which are in a positive direction on the Z axis. As for the location of the impulse, we use the absolute position of the bowling ball. Like our sentiment about typical keyboard game play, we assign the W key for rolling the ball forward down the lane.
case "w": ballAggregate.body.applyImpulse(new BABYLON.Vector3(0, 0, 20), bowlingBall.getAbsolutePosition()); break;Summary
Let’s get rolling! Now that we have our bowling lane, pins and bowling ball setup, we can play our game. Use the A and D keys to move the bowling ball to the left or right and press the W key to send the ball rolling down the lane. Did you get a strike? We hope so!
Here's the complete playground: Bowling
Although this is a simplified version of a bowling game, we encourage you to let your imagination run wild and build upon this sample. If you’re in need of inspiration, consider adding some of the following features:
- Reset the ball to the start position after the initial roll
- Keep score of how many pins fall
- Add advanced manipulations to the ball such as spins
- Reset the pins after rolling the ball
- Swap out the existing assets for your own custom designs