Solid Particle System Materials
Different Materials
The SPS renders all the particles in a single draw call because you've used only one material, or none what means a default material under the hood, so far.
Sometimes yet, you may want to use several materials in order to render some glowing particles with the glow layer, some others with a bump texture and some others with a colored standard material for instance. In this case, you may accept that the draw call number is higher but you wish it keeps at its possible minimum.
The SPS supports the MultiMaterials and provides a mechanism to keep the draw call number to a minimum value. You can use them by different ways.
Simple way
The simplest way to set different materials to the particles is to set a different material to each model used to create the particles and to ask the SPS to use these materials at construction time with the optional paramater useModelMaterial set to true (default false).
// model1, model2 and model3 are meshes with already set materials at this stepvar sps = new BABYLON.SolidParticleSystem("sps", scene, { useModelMaterial: true});sps.addShape(model1, 300);sps.addShape(model2, 300);sps.addShape(model3, 300);sps.buildMesh();This enables the multimaterial support, then copies the model geometries and creates automatically the SPS multimaterial from the model materials, with the following rule :
- if several models share the same material, this material is used only once in the SPS : particles are sorted in this purpose to minimize the draw call numbers,
- if a model has no material, a standard material is created,
- if another following model has also no material, the first rule applies : the newly created standard material is shared among the particles depicting all the models with no material.
Example: Materials In SPS
You can obviously notice that this method associates the model materials to the particles on the particle shape basis : all the particles of a given shape share the same material.
You can still change this behavior by assignig some materials on the particle basis by setting the particle property .materialIndex value to the wanted material index. The material index is simply the index of the shape material in the order the shape are created : 0 for the first shape, 1 for the second one, and so on. If set, it overwrites the assigned shape material index.
This can be done at creation time in a positionFunction of an immutable SPS for instance.
var initParticle = function(particle, i) { particle.position.x = areaSize * (Math.random() - 0.5); particle.position.y = areaSize * (Math.random() - 0.5); particle.position.z = areaSize * (Math.random() - 0.5); // above a given altitude, it's given the material 1 // whatever the initial shape material if (particle.position.y > areaSize * 0.1) { particle.materialIndex = 1; }};var sps = new BABYLON.SolidParticleSystem("sps", scene, { useModelMaterial: true, updatable: false});sps.addShape(model1, 300, { positionFunction: initFunction });sps.addShape(model2, 300, { positionFunction: initFunction });sps.addShape(model3, 300, { positionFunction: initFunction });sps.buildMesh();Example: Solid Particle Material Assignment
This method can be used to build non-updatable meshes with MultiMaterials by assembling shapes of different materials even when knowing nothing about indices nor vertices as it's required to define a MultiMaterial object by hands : https://doc.babylonjs.com/how_to/multi_materials
Intermediate way
When you set the SPS useModelMaterial property to true, this enables the support for MultiMaterial.
You can also enable this support by just setting the property enableMultiMaterial to true.
In this case, the difference is that the support is enabled but the model materials aren't copied at construction time.
You may want then to use your own set of materials instead of the model ones.
So, whatever the SPS is immutable or not and whatever you're using enableMultiMaterial or useModelMaterial, you can pass your own materials to the SPS once it's build with the method sps.setMultiMaterials(arrayOfMaterials).
var sps = new BABYLON.SolidParticleSystem("sps", scene, {  enableMultiMaterial: true,  updatable: false});sps.addShape(model1, 300, { positionFunction: initFunction });sps.addShape(model2, 300, { positionFunction: initFunction });sps.addShape(model3, 300, { positionFunction: initFunction });sps.buildMesh();
// mat0, mat1, mat2 are Material objectssps.setMultiMaterial([mat0, mat1, mat2]);
// ... later in the code, swap mat0 and mat1sps.setMultiMaterial([mat1, mat0, mat2]);
This method can be called as many times as needed once the SPS mesh is built.
It recomputes the underlying MultiMaterial object and the SPS geometry in order to group the particles by materials, so it's probably not a good idea to call it each frame in the render loop.
Example: Intermediate Solid Particle Material Assignment
Advanced way
Until now, you've essentially set the particle materialIndex values at construction time and they haven't changed then, only the materials themselves have changed.
You can still change the particle materialIndex values at any time, for instance in a call to sps.updateParticle() from sps.setParticles() like you would do to change the particle positions or rotations, or in a call to any other function of your own at some moment.
The difference with the other particle properties (positon, rotation, etc) is that setParticles() doesn't compute the materials at all.
Indeed setParticles() is designed to be called each frame in the render loop and to make sure to keep the garbage collector activity to its minimum by allocating nothing.
Applying the changes of materialIndex values requires to sort again all the particles, to recompute the whole SPS geometry and moreover to recreate new SubMesh objects from the SPS mesh.
Therefore a dedicated method is provided sps.computeSubMeshes(). This method is to be called manually after each change of particle materialIndex values for them to be taken in account at once.
Like setMultiMaterials(), it's probably not a good idea to call it each frame in the render loop.
// updatable SPS creationvar sps = new BABYLON.SolidParticleSystem("sps", scene, {  enableMultiMaterial: true});sps.addShape(model1, 300);sps.addShape(model2, 300);sps.addShape(model3, 300);sps.buildMesh();
// mat0, mat1, mat2 are Material objectssps.setMultiMaterial([mat0, mat1, mat2]);
// the particle materialIndex are set in the call to updateParticle// while the mesh and the multimaterial are already builtsps.updateParticle = initFunction;sps.setParticles(); // updates the particle positionssps.computeSubMeshes(); // actually computes the submeshes and materials
Examples: Advanced Solid Particle Material Assignment 1 In this second example the particles above a given altitude are given the next material in turn every 15 frames. Advanced Solid Particle Material Assignment 2
If you still really want to call computeSubMeshes() each time you call setParticles() because your particle materials are updated at this same frequency, you can then set the property sps.autoUpdateSubMeshes to true (default false). In this case, no more need for calling sps.computeSubMeshes() by hands as setParticles() will do it for you internally.
sps.autoUpdateSubMeshes = true;sps.setParticles(); // updates the particle material indexes AND recomputes the subMeshesExample: Advanced Solid Particle Material Assignment 3
In the case you want to make your own MultiMaterial object by hands, then set it to the SPS mesh material property and call sps.computeSubMeshes() to internally build the needed SubMesh objects.
var multimat = new BABYLON.MultiMaterial("multi", scene);multimat.subMaterials.push(material0);multimat.subMaterials.push(material1);multimat.subMaterials.push(material2);
sps.mesh.material = multimat;sps.computeSubMeshes();
Note 1 : By default, the particle materialIndex value is null.
When enabling the MultiMaterial in the SPS, this value is set to zero for every particle until it's overwritten by the user or automatically set to some model material index by useModelMaterial.
Note 2 : The particle depth sort doesn't work with the MultiMaterial support because particles can't be sorted by their distances to the camera and by materials in the same time. So if you enable both modes, it won't crash but it will get to some weird visible results.
Note 3 : The SPS MultiMaterial support works also with an expandable SPS, meaning you can add/store/remove particles with different materials. When calling sps.buildMesh() again, everything is then recomputed automatically.
Solid Particle Systems and Node Materials
As was mentioned above, setting useModelMaterial to true on the SPS constructor will allow the material assigned to an added mesh to be used with the SPS mesh's multimaterial. This material can be any type of material defined in the engine, including a node material. Using a node material can give added flexibility to the SPS mesh as it can be authored to work in concert with the initParticles and updateParticle methods to create a striking render.
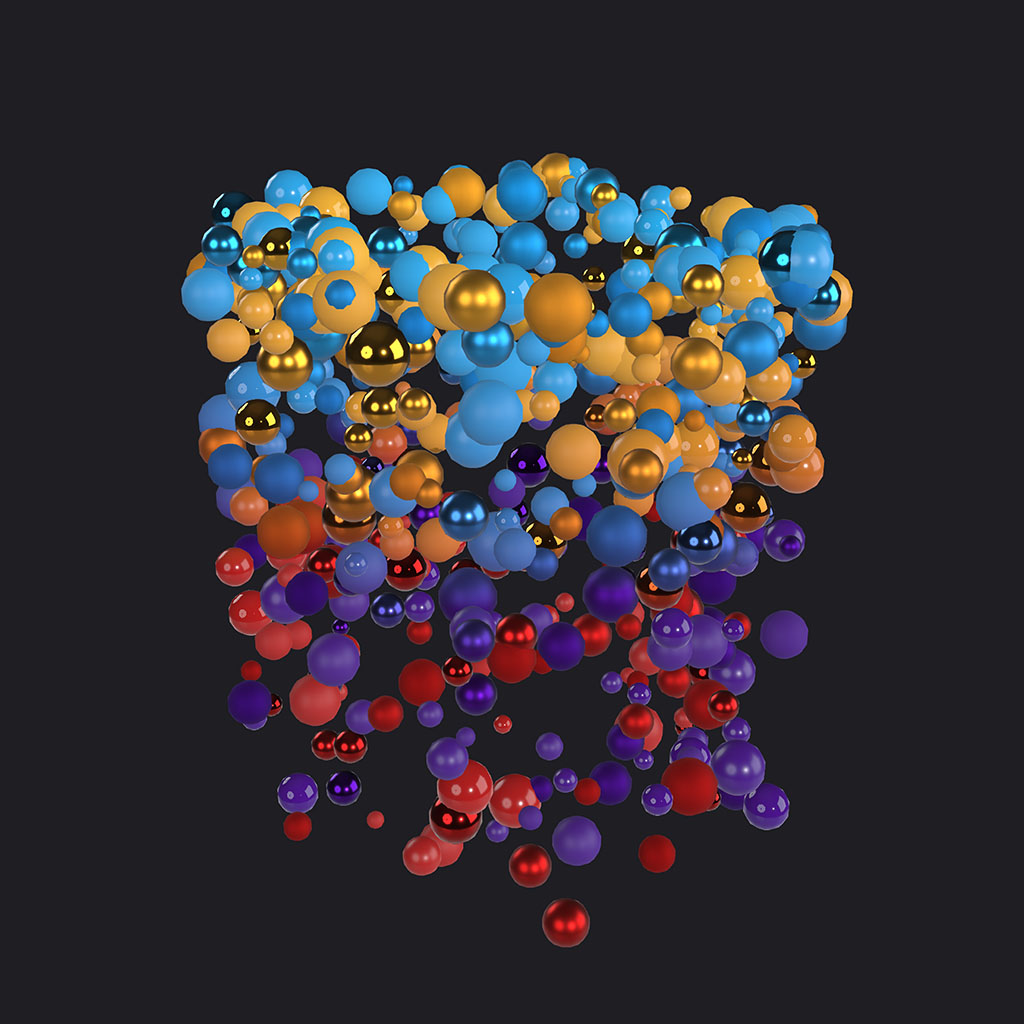
This render shows a solid particle system using a node material employing PBRMetallicRoughness nodes, random metallic and roughness values, world postion-based base color gradients, and randomized color pairings. Normally, setting useModelMaterial in the SPS constructor is all that is needed but there are a couple of considerations to keep in mind.
- Cleaning up the scene memory by deleting the original mesh added to the SPS is fine, but leaving the original node material in the scene is important. With the node material available, changes can be made to the material's uniforms to update the node material in real time which will be reflected in the SPS Mesh.
- If the SPS Mesh is taking advantage of
particle.colorthe property is a nullable Color4, but can be assigned aColor3in code. Node material will be able to accessparticle.colorusing the mesh colorInputBlock, but it is important to understand what class,Color3orColor4, was assigned in code. If the property was assigned aColor3, then theInputBlockneeds to be connected to aColorSplitterBlockand theColor3output should be used for calculations. If connecting theColor4output to another block is attempted, the type mismatch will cause an unexpected conflict due to the missing channel that will likely result in nothing rendering. Matching the declaration ofparticle.colorto the component channels used in the node graph will ensure the node material renders correctly. - Not all node material blocks will work with an SPS mesh. For example, SPS meshes do not contain bones or morph targets so those blocks will not add any benefit to the node material.
- Performance is something that needs to be front of mind when using node materials with SPS meshes. It is easy to create an SPS mesh that is very dense depending on the complexity of the original mesh and the number of particles in the SPS mesh. If a node material added to the SPS mesh is doing a lot of calculations per vertex or per pixel on a dense SPS mesh, a drop in frame rate would be expected. Balance is needed if doing something like vertex displacement on an SPS mesh to ensure that the mesh is not too dense either with too many vertices in the original mesh or too many particles added to the SPS mesh.
SPS and Node Material example
The render above is from the following example which leverages the particle.color to randomize PBR parameters while also using world position to drive the color blend of the particles. The particle.color could have easily been used as the base color input of the PBRMetallicRoughnessBlock or even to combine with a color uniform in the graph, but instead it is leveraged to help us get more contrast in the material by providing up to four random values to work with.
In this case the particle.color value is using the red channel to randomly choose between a blue-purple gradient and an orange-red gradient for the particle color. The green channel is used directly as the roughness value allowing every particle to have a different roughness value. And the blue channel is used with a step node to assign either 0.0 or 1.0 to the metallic factor of the particle so some are metallic and others are dielectric. A fourth value could have been added though the alpha channel if the particle.color had been defined as a Color4.
The other calculation that is being done is a normalized world position on each particle to drive the interpolation between the two colors of either gradient. This results in the particles slowly changing colors as they move along the Y-axis. This is a simple example, but is a good launching point to illustrate how leveraging node materials with SPS meshes is a powerful technique available in Babylon.js.
Combining SPS with Node Material