Planning Your Assets for Real-Time Rendering
Why You Should Plan
When you start thinking of creating an art pipeline for a 3D experience rendered in real time, there are some questions you should ask to help determine what the pipeline will look like or limitations you should account for early.
Many artists are used to creating an asset for a scene that will be pre-rendered - or rendered offline - where you are letting a ray tracing renderer take as much time as needed for the final image. In those cases, optimization of the scene will likely help speed up the render somewhat, but there won’t be a quality difference in the final render. Because of this, the artist will always make a judgement call about how much time it takes to optimize the assets in a scene versus how much time is saved in rendering. Often, the time lost in optimization is not a good tradeoff for the time saved on the render unless your scene is regularly re-rendered.
Optimization of assets is a very different topic when speaking of real-time rendering. In most ways, real-time rendering is a completely different pipeline to pre-rendering because you need to render your scene 60-120 times every second. Because of the need to render so quickly, most real-time rendering engines use approximations to simulate what you might see in a pre-rendered scene, or they may limit or eliminate elements of a pre-render all together. This means real-time assets need to follow a different set of rules to help the engine maintain the high frame rate needed to make an experience smooth regardless of whether the scene is viewed on a screen or in a head-mounted display (HMD).
Asking the Right Questions
When you start planning for a real-time rendered experience, the best way to start is to ask a series of questions to set expectations of what the assets need to accomplish.
What is the target device?
Is your experience targeted for desktop, mobile, or HMD? Do you have any limitations for the devices you are targeting such as a lower performance specification of a chromebook or feature phone? The limitations on your target device will start to give you a roadmap for where you may need to set hard limits on parts of your assets. You may want to limit maximum texture size, triangle count, mesh count, or material count as a way to reduce draw calls and memory requirements for your assets. On the other hand, if you know your target device is a higher performance specification device with a lot of resources, you may be able to take advantage of it with larger limits on your assets or more expensive post process rendering techniques like soft shadows.
What is the shading model?
The choice of shading model will influence how you approach texture creation, UV layout, and material breaks in your assets. This decision will be driven by the art direction for your experience and what overall feel you are trying to convey. Are you creating an e-commerce experience where you need to show accurate materials that can influence the buying decision? If so, you will likely want to make use physically-based rendering (PBR) materials so you can enable image-based environment lighting to make your scene feel more realistic. Do you want a more stylized approach with bright colors and simple lighting for your casual farming game? You may want custom shading so you can simplify the look and keep your materials, light, and shadows adhering to the same art target.
The art pipeline for creating realistic asset or stylized assets do have some overlaps, but they may diverge drastically from one another. Realistic assets may rely heavily on detailed normal textures where a stylized approach may forego normal textures all together. Stylized assets may require a specific UV layout to adhere to their custom shader's requirements where realistic assets may need to rely more on maximizing the texel density of UV islands to account for small details or cameras that can get close to the asset.
Defining the art target for your experience early while you are still in the proof of concept or prototype stage will be essential as it determines how your assets will be created. Waiting until later in the process or changing the style during production is a very expensive endeavor as it could invalidate much of your asset pipeline and require massive reworks of materials, UVs, textures, and environment lighting.
Do my materials need advanced rendering techniques?
When creating assets that have special materials which are translucent, transparent, or coated, you will need to account for these techniques in your shaders. For example, you may be making a car asset that has a metallic paint with a clear coat and glass mixed with more traditional metallic and dielectric materials like aluminum rims and leather seats. If you were to use the same shader for every material, your asset would not be optimized because the requirements for a clear coat are different than the requirements for glass - not to mention both of those materials require more operations than the standard metallic or dielectric materials.
On the one hand you want to separate materials that have unique requirements from your basic materials so you aren't doing unnecessary calculations in your shader. On the other you want to try to combine the parts of your asset that have similar material requirements to reduce the overall number of materials in your scene to reduce your draw calls.
What is the triangle budget for my asset?
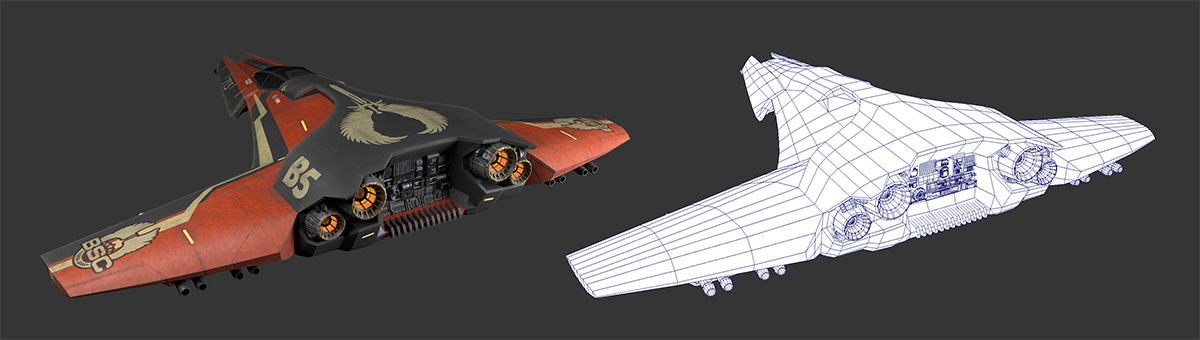
The triangle budget for assets is always a hot topic for art pipelines. Assets that require greater fidelity will normally require a higher triangle budget but that comes with an obvious cost in download time for the asset and memory footprint. This typically results in a hierarchy of importance for assets in the scene. If the asset is a hero asset that will be primarily close to the camera, you will likely see a higher triangle budget for it. If the asset is a background element that is either not close to the camera or only rendered for a short amount of time, the triangle budget may be much smaller.
The number of assets being rendered at any given point need to be accounted for in your triangle budget which will give you guidance as to how many triangles to allocate to each type of asset. If you are making an e-commerce experience that will render one object only so the user can inspect what they are buying, you may be able to use a triangle budget of up to 100,000 triangles for your asset. However, if you are making a game which will have a player character, many non-player characters, and environment assets you may only be able to assign 15,000 triangles to your main character. The rest of the non-player characters and environment assets will have to have smaller budgets depending on the number of assets rendered to hit your performance targets.
Where do I spend my triangle budget?
The best approach is to spend your triangles in areas that support the silhouette or parallax in the mesh while reducing triangles from parts of the mesh that do not support the silhouette or parallax.
Where can I eliminate triangles?
The best way to reduce the number of triangles an asset uses is to make sure you are spending your budget where you get the most benefit from it. The simplest of these is simply to delete triangles that the user won't see. There is no need for manifold geometry in real-time rendering so any triangles used for interior detail or to make a mesh water-tight that do no render are wasted.
The practice that has the most impact is to make sure you use your triangle budget where you need to hold silhouette or show parallax within your mesh. If there are a lot of triangles in areas that don't deform and are not needed for the silhouette of the mesh you are wasting triangles. Most of the time you will not see a uniform spread and size of triangles in an optimized mesh. Areas that deform or are important to describe the silhouette of the mesh will have smaller, densely-packed triangles. Areas that do not deform or do not contribute to the silhouette will have larger, lightly-packed triangles.
You can also benefit from employing some simple tricks to reduce triangles. The first of which would be to allow meshes to intersect instead of creating complex geometry. A cylinder connecting to a plane will create more resolution to hold the intersection than if you simply allowed the cylinder to intersect with the plane.
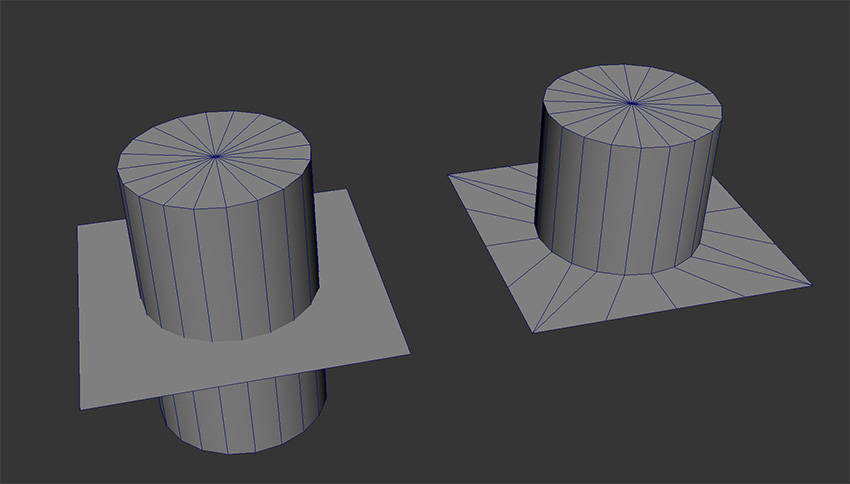
To expand on the idea of eliminating complex intersections, you can also float geometry on top of one another for small areas of detail. Imagine you needed some panel lines in the middle of a flat surface like the image below. Floating a mesh that creates the panel lines slightly above the quad will give the illustration of a complex connection without the triangle cost of the connection.

Think outside of the box for how you can use non-manifold meshes to simulate complex connections without creating those complex connections. You can further hide these fake connections with some tricks in your texturing so make sure to experiment with your mesh to see where you can reduce your triangle count.
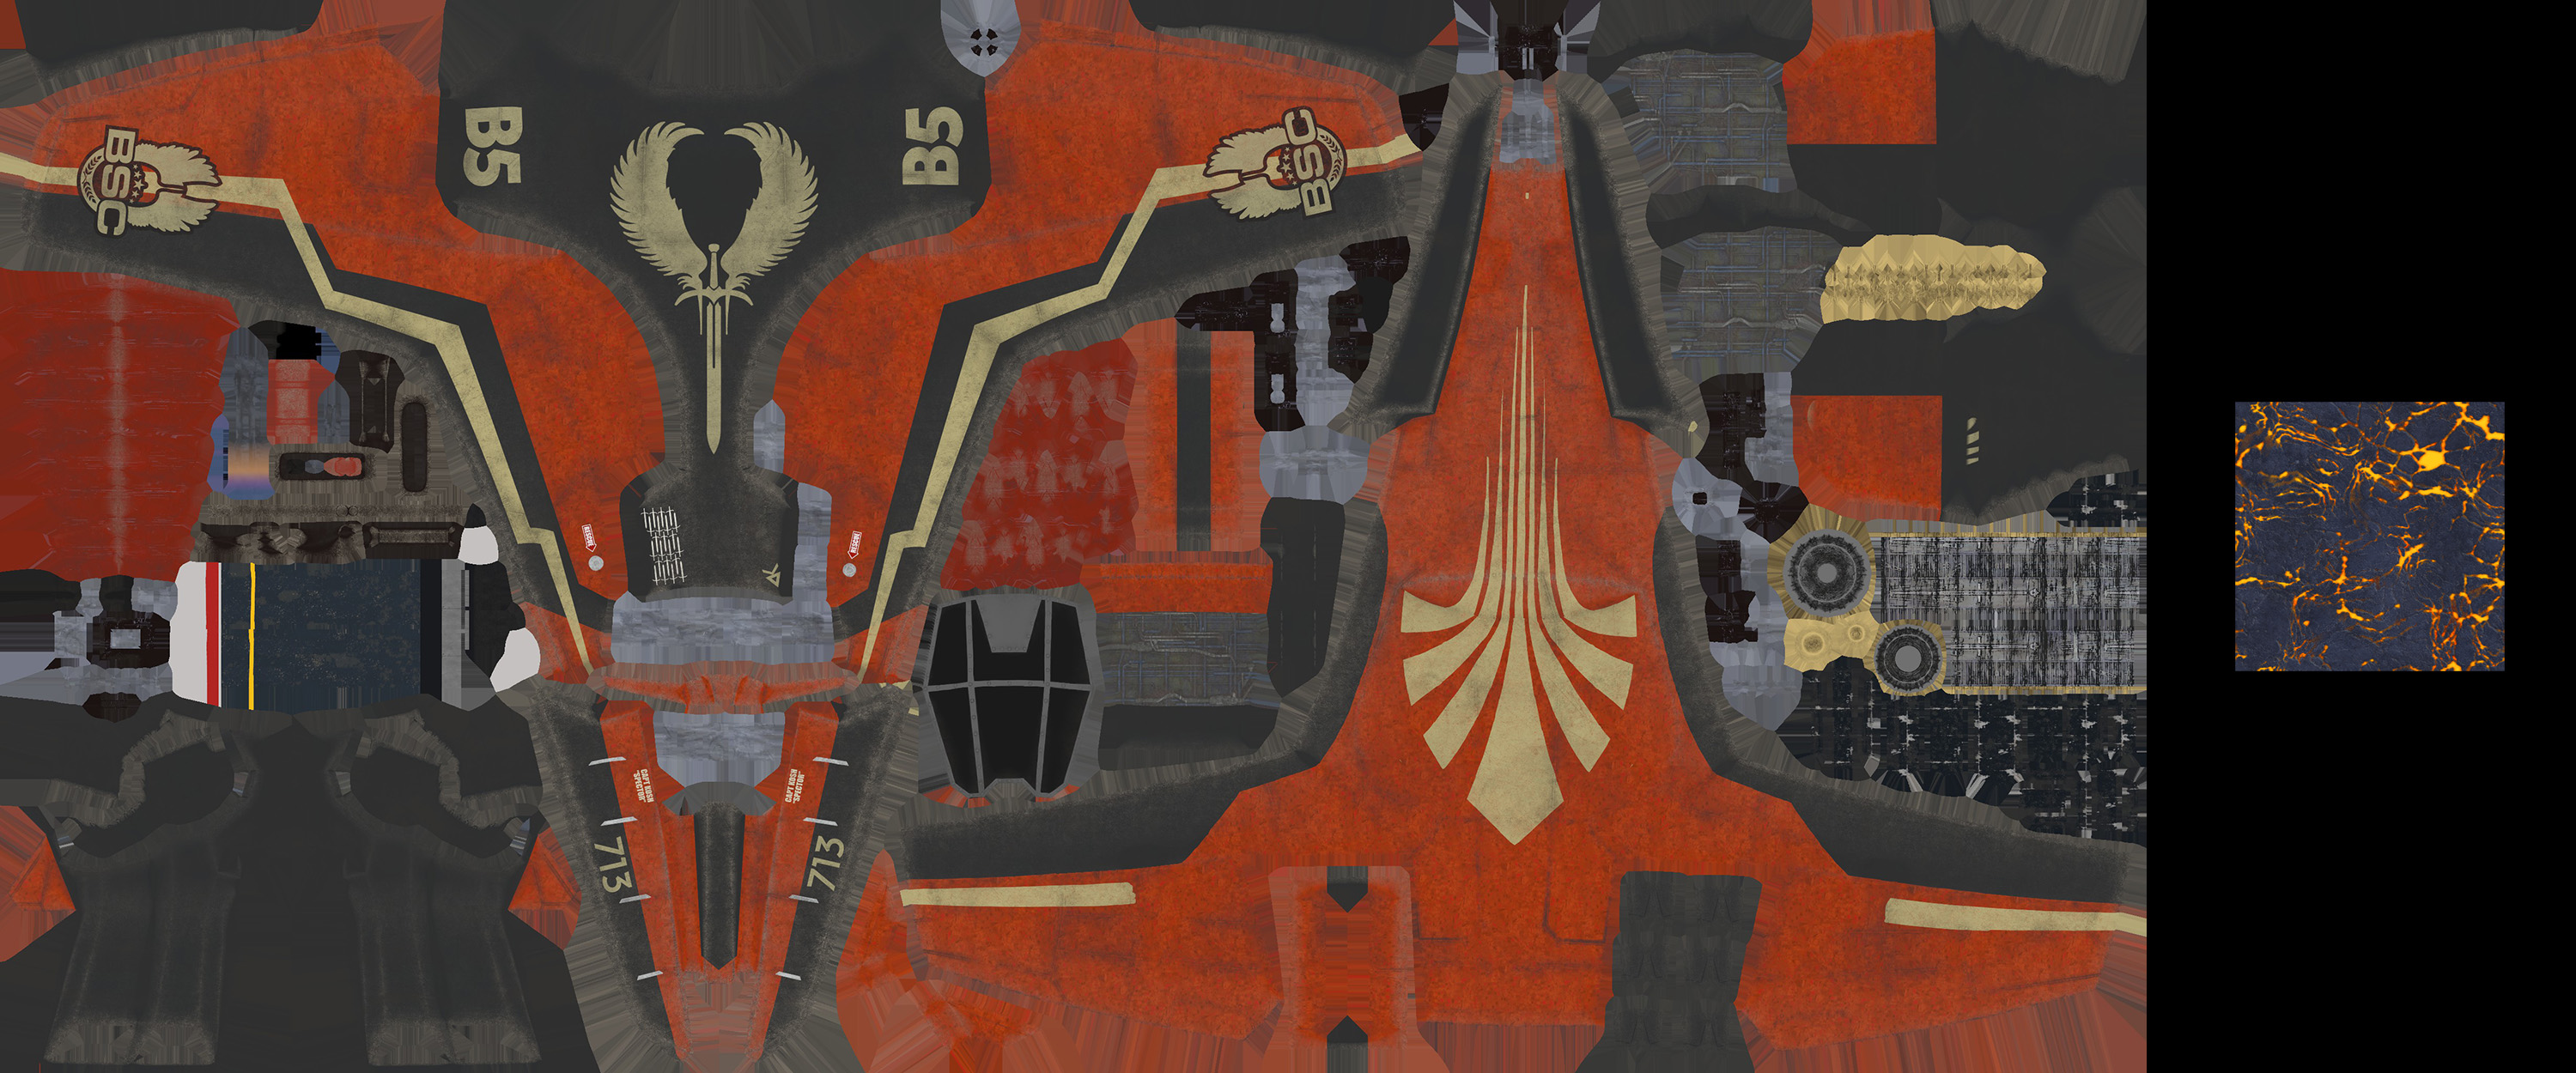
What detail can I bake to eliminate triangles?
Baking high-frequency details into a normal texture can do a lot to save triangles. Details like scratches, chips, panel lines, rivets, wires, and more are perfect candidates for baking. Baking detail like this into the normal texture will give you a more realistic render without increasing your triangle count. As you can see below, we are able to maintain a very low triangle count while still maintaining details like rivets and panel lines.
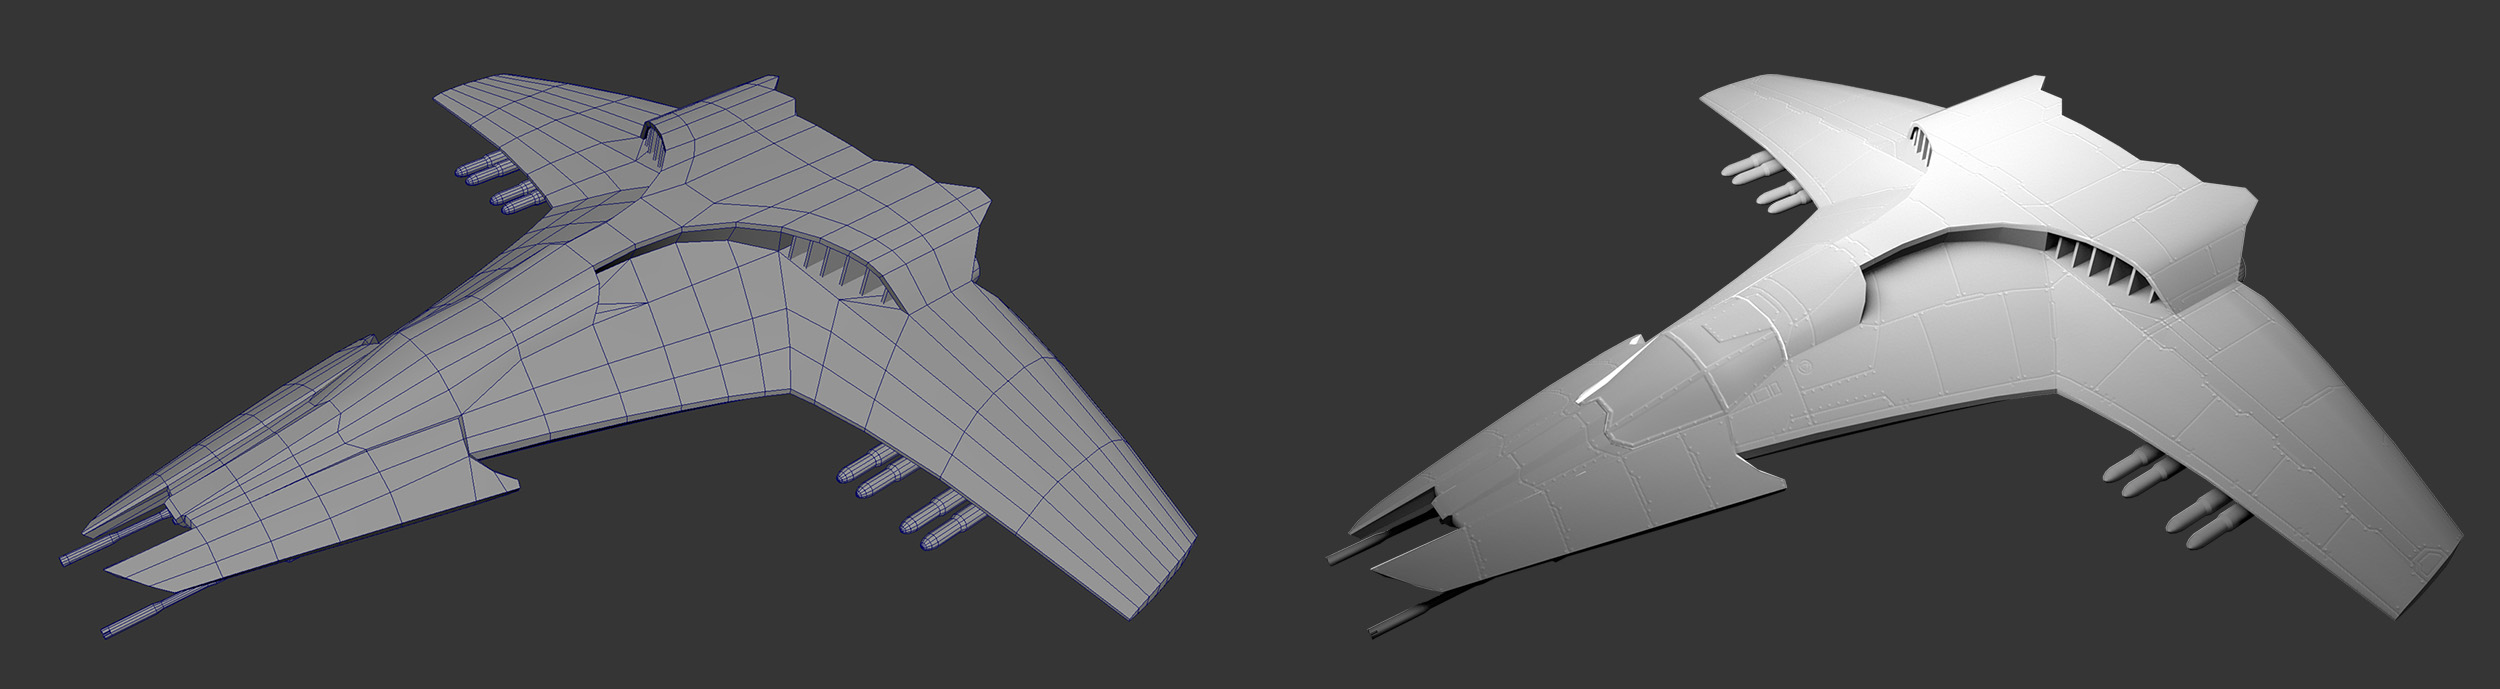
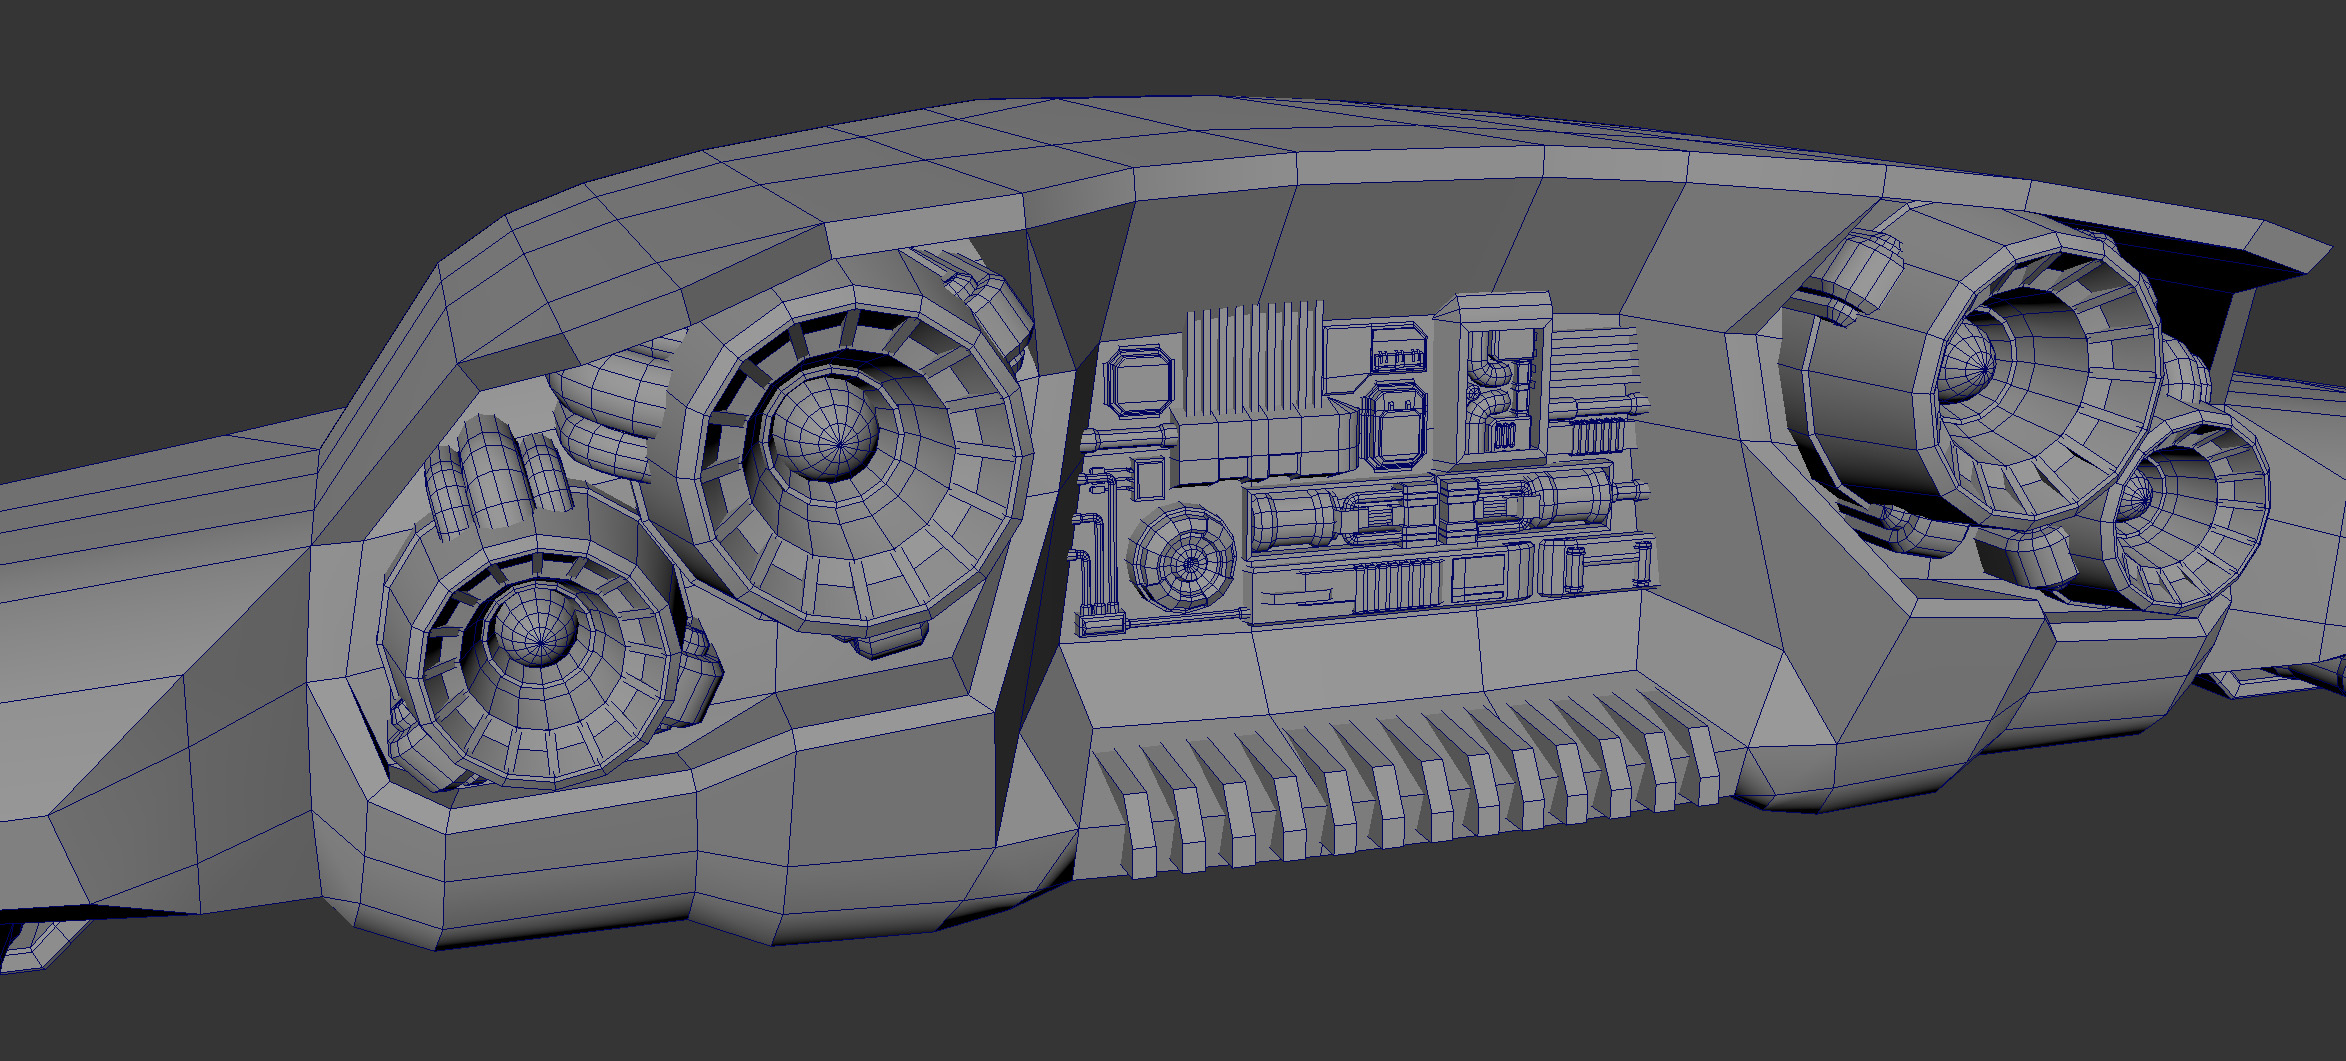
Many materials come with complex normal textures and it is easy to think you can bake everything into your normal texture. However, there are a couple reasons why you wouldn't bake some detail into your normal texture. The first is that the fidelity of your asset is bound by the texel density of your normal texture. If you have a lot of shells competing for texels in your UV layout, you may see pixelation of your detail if your texture isn't large enough. This could lead to larger normal textures or using several normal textures - both of which will impact download times and memory footprint. The second is that you need to see parallax in your detail. As you can see in the image below the visible detail inside of the engine outtakes will change based on the angle to the camera. The same is true with the mechanical details on the back of the ship.
If this detail were to be baked to a normal texture you would certainly reduce the triangle count dramatically. However, you would also lose the parallax of the detail when the camera moves around the asset. The detail would appear to be flat like a photo, even though the lighting would look correct. This would cause the asset to fall into the uncanny valley where the viewer's brain would register that something did not look right but may not be able to pinpoint what it is. This could be distracting and ultimately result in a negative experience for the user. This is why it's important to make the decision to bake detail on a case-by-case basis. If you can get the benefit of reduced triangle count while not needing parallax you should bake the detail. Even if you could benefit from some parallax in the detail, if it is small enough not to be distracting, you can still probably bake it. Otherwise, keep detail that needs parallax in the mesh which will drive your decisions about where to spend the triangles in your budget.
What is the largest texture size I can use?
Just because your texturing software can render an 8K texture does not mean you can use one in a real-time renderer. You will want to check on limitations for your file format (4k for glTF) or rendering engine. You may decide that the better path is to create multiple texture sets using a smaller texture size applied to multiple materials is a better trade-off. It could mean that even though you are taking a hit for more texture downloads and extra draw calls for the additional materials that you end up with better texel density across your asset.
You may also decide, based on what parts of your asset are closest to the camera, that you create separate texture sets for parts of your asset that need more texel density to hold the important detail. This is a good area to prototype early on so you can decide on a texel density per unit of measure for your assets. This will allow your assets to feel as though they have the same quality while also informing decisions around material breaks.
Can I use tiled textures?
There are two main approaches for UVing your models based on what types of textures you want to use. The first is a tiled texture where you UV your mesh to use a small texture tiled multiple times simulating a more complex material. Think of a brick wall or hardwood floor. If you use a texure that is only a small section of brick or hardwood and allow it to tile multiple times across your asset, you get a much higher texel density while being able to leverage a smaller texture size.
The second method is to atlas your UVs which creates a unique unwrap of your asset within UV space. This allows for a more realistic render as you don't have any repeating patterns in your final asset, but you do require a larger texture or more texture sets to keep up with the texel density of a tiled texture. To illustrate this point, refer to the image below where you can see an atlased texture on the left and a tiled texture on the right. These two textures are the same texel density, but you can see that the tiled texture is much smaller. However, the challenge with the tiled texture is that you cannot get unique details in different parts of your asset. You would need to break up the asset into many more materials passing individual tiled textures to each. It is also much harder to unwrap unique shapes to take advantage of tiled textures without showing seams.
It's best to use both atlased textures and tiled textures where their strengths shine and combine them when necessary.
Can I use non-square or non-power-of-two textures?
What do we mean to say non-square or non-power-of-two? Non-square is self-explanatory in that the texture simply isn't square in measure. Some engines set this limitation and only allow square textures to be used in materials.
A power-of-two texture is one that adheres to the following sequence of sizes:
- 16 pixels
- 32 pixels
- 64 pixels
- 128 pixels
- 256 pixels
- 512 pixels
- 1024 pixels
- 2048 pixels
Note that each dimension is half or double the ones on either side if it in the sequence. You can extrapolate other sizes by following the same pattern. Some engines will require all textures to be in a power-of-two size.
Babylon.js allows the use of both non-square and non-power-of-two textures in your materials. This is important because it gives you a lot of flexibility in maximizing your asset's quality. Remember the image above showing the atlased texture? This texture is non-square so that we could achieve a better UV layout maximizing the UV shell sizes and wasting less space in the layout. Had we used a square texture, we would not have been able to fit the UV shells as nicely and would have wasted texels in dead spaces of the layout.
Where non-power-of-two textures come into play is when you have a texture that does not need more pixels. Let’s say that you have a decal for a wall that needs only 80 pixels by 80 pixels. If you had to use power-of-two textures, you would be wasting file size both in download and in memory as you would have to use a 128 x 128 texure for the decal. And if you were trying to match texel density with other assets, you would need to play with scaling your decal to account for the extra unneeded texel density in your power-of-two texture.
Do I need to animate this asset?
While there are different types of animation that can be used on an asset, identifying what type of animation you will be using in your experience will help you plan your asset. Here are the main types of animation you could choose:
- Node animation: This is the simplest form of animation where you are applying animation data at the transform level of the asset. This is simply translating, rotating, or scaling your asset all at once.
- Skinned animation: This is animation that requires a skeleton and skinning information for your mesh to deform correctly. The animation is applied to the skeleton and the mesh will follow the skeleton based on the skinning information.
- Morph target animation: This is a complex form of vertex animation where the vertices in your mesh interpolate between their original position and a position determined by a morph target mesh. This is usually used for subtle animation like a frown where you can get very specific deformation without the need for extra bones and potentially complex skinning data to accomplish the motion.
If you choose to go with node animation, you should not need to do anything else to your asset to prepare it for motion. Skinned animation will require you to create a skeleton and skin your mesh to it. You may also want to create a control rig to make animation easier but that would only be for your animation process in your digital content creation package as it will not export to glTF. Morph target animation will require one additional mesh per morph target which holds the target's vertex positions.
Another consideration for animation centers around the team creating your assets. If you have several artists and animators working on your assets, you may want to consider separating the creation of the asset's components across several people. You could have one person creating the mesh, another creating the texture sets, another to rig and skin the asset, and another one or more to animate. If you have a split of artists to create the asset and one or more to animate you may consider creating the mesh, materials, textures, and skeleton as one file and each animation clip as a separate file. This gives you the maximum flexibility to have your team go in and edit or change each component without stomping the work of others. It also allows fixes or edits to individual animation clips, textures, or meshes quickly with small deltas that don't run the risk of stomping other changes or potentially introducing bugs into other components of the asset.
Is this everything that I would need to consider?
Unfortunately, that really isn't the case since each experience will have its own requirements for any given asset. However, these questions should get you a long way to determining your individual asset requirements.